• Home
  • Blog
YoCoBoard – Support

YoCoBoard-Zendesk Integration

July 25, 2017 2:58 am / Leave a Comment / YoCoBoard Admin

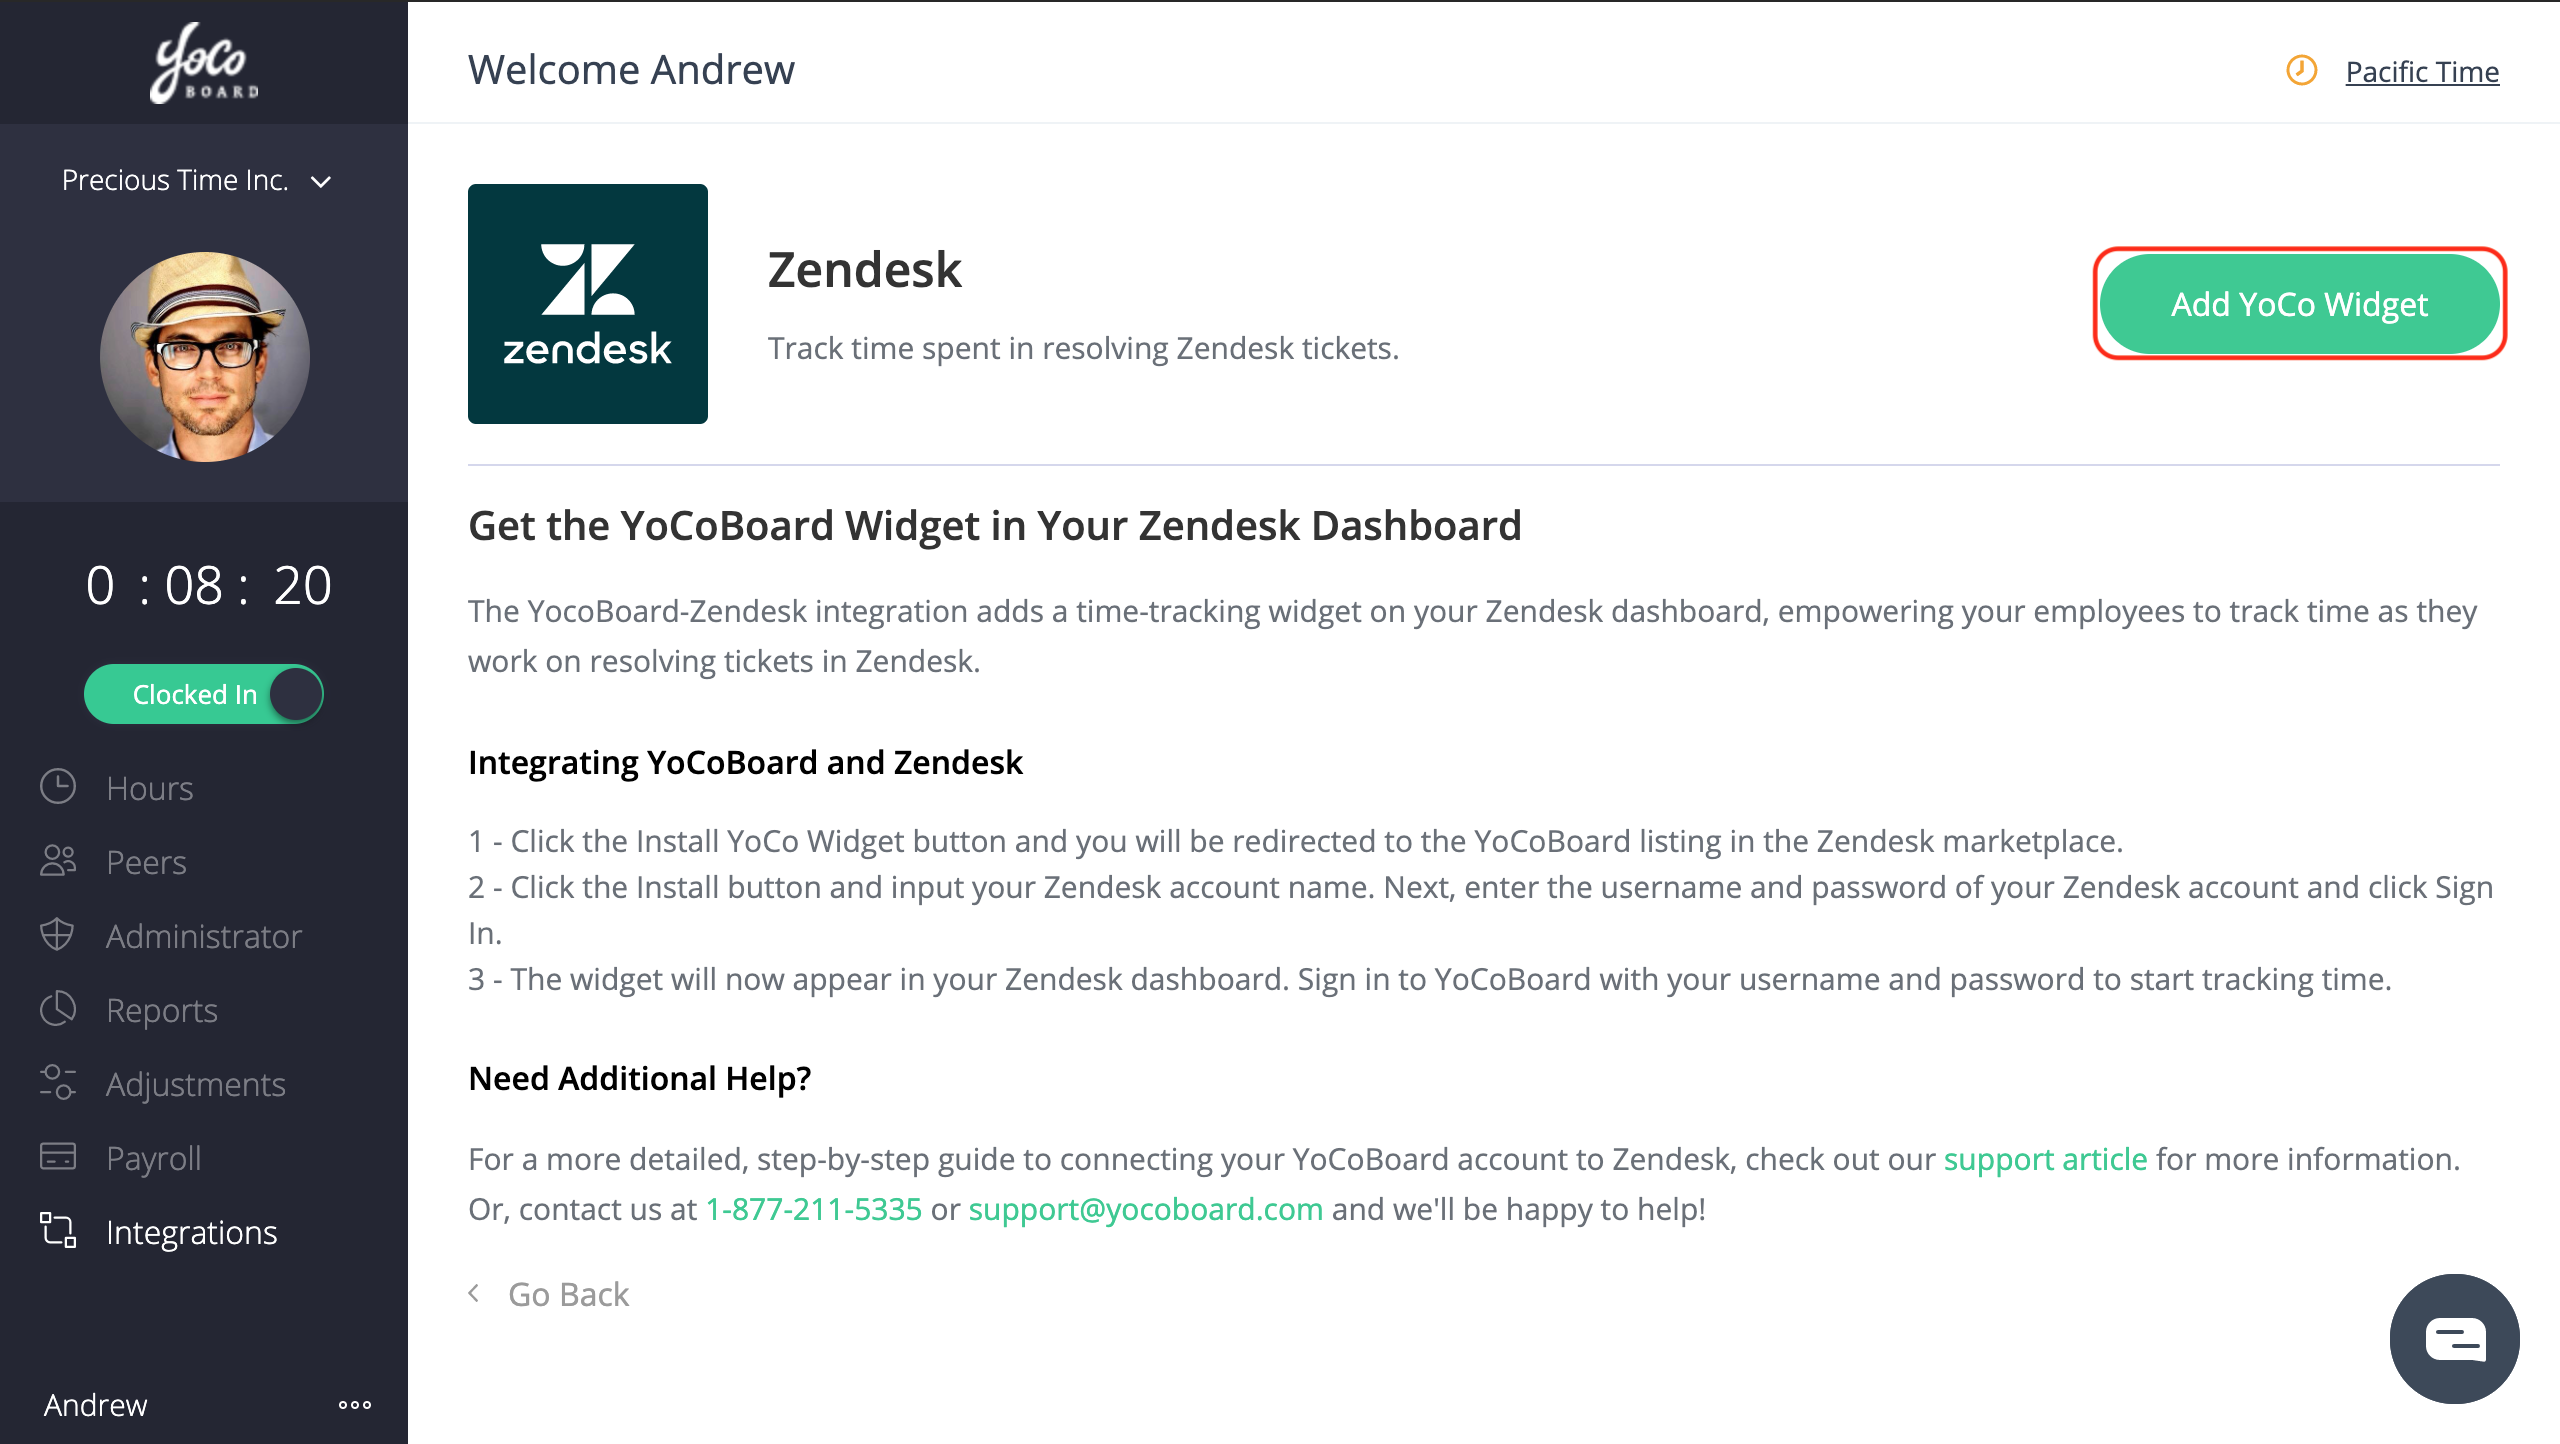
Track time spent on Zendesk tickets

The YoCoBoard-Zendesk integration adds a YoCoBoard widget to your Zendesk dashboard. With the YoCoBoard plugin, empower your helpdesk team to track time spent on resolving tickets from inside your Zendesk dashboard.

1.1 What can you do with the YoCoBoard Zendesk integration?

Automatically tag the ticket name to an active session, view productivity break up under a tracked task and much more with the new YoCoBoard plugin.

The integration also allows you to configure widget accessibility that lets you specify team members who can use the widget to track their time on Zendesk.

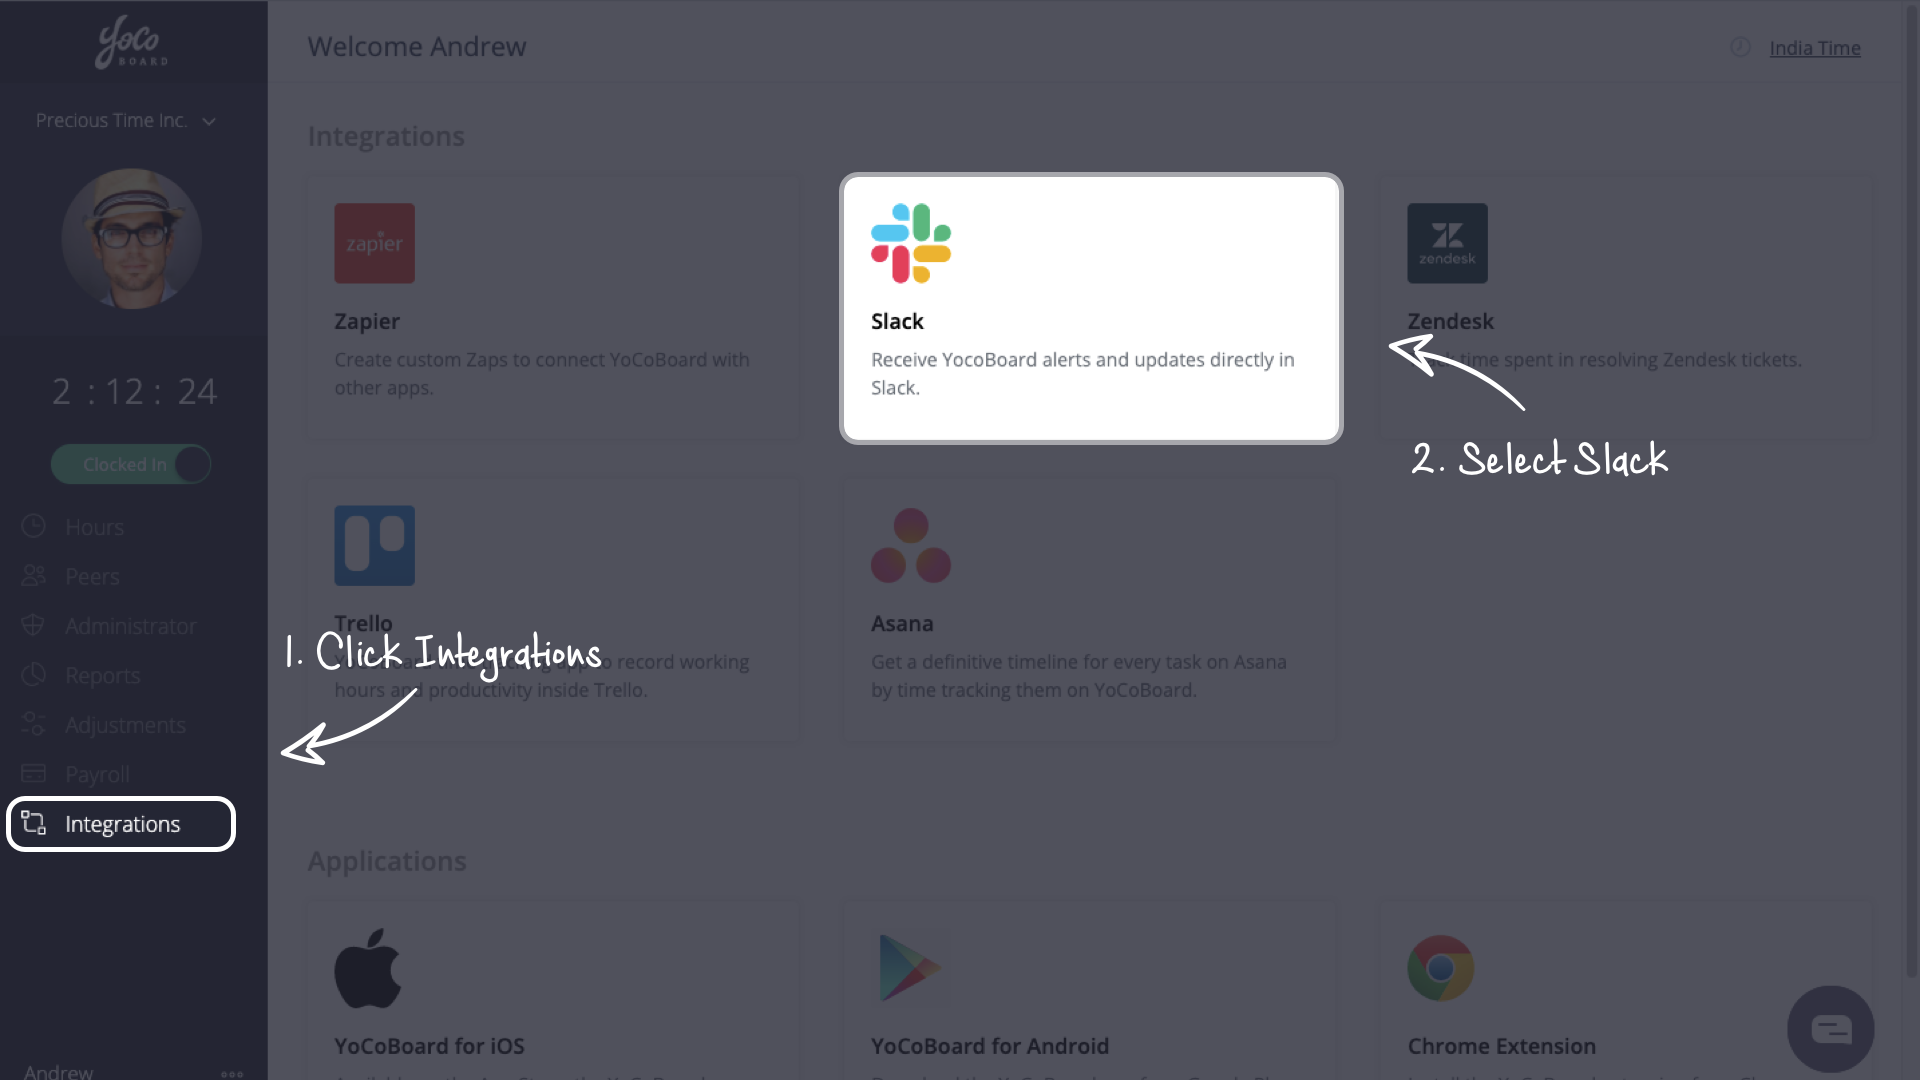
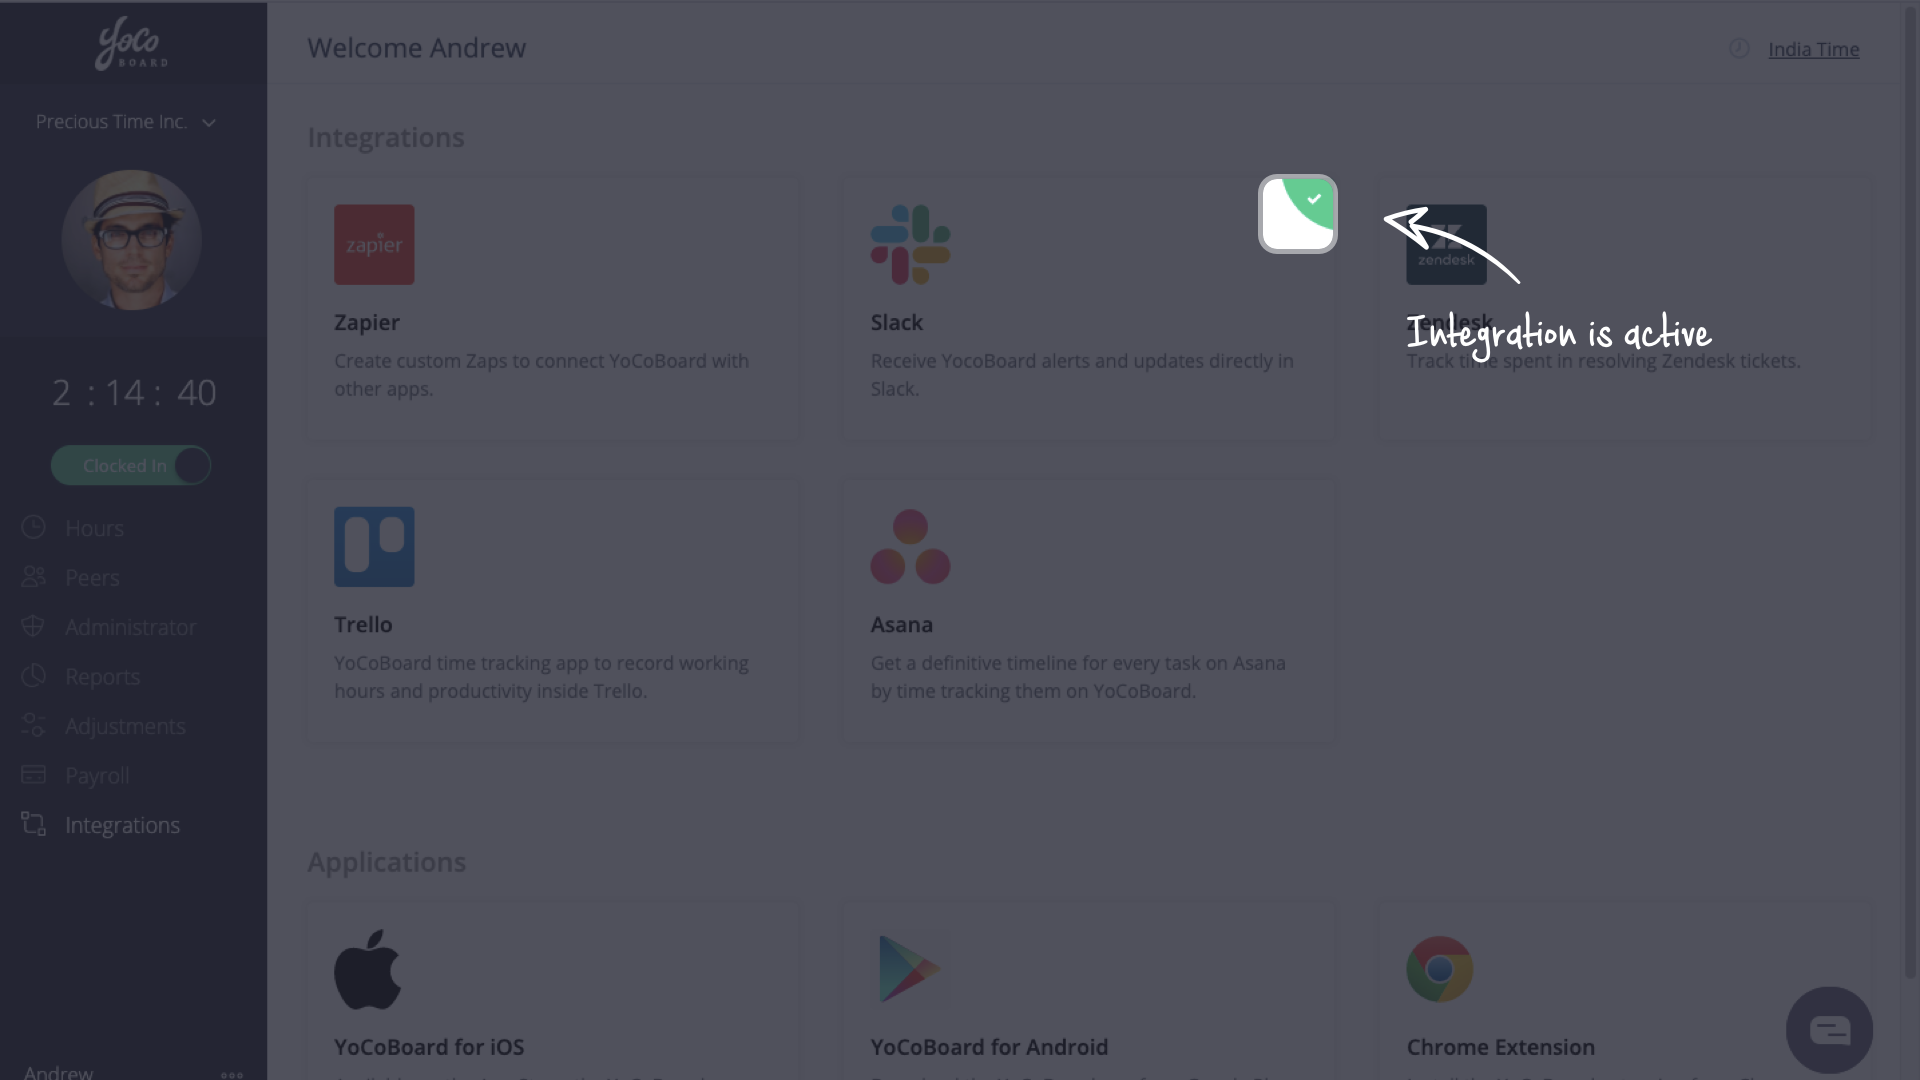
1.2 Activating the Zendesk integration

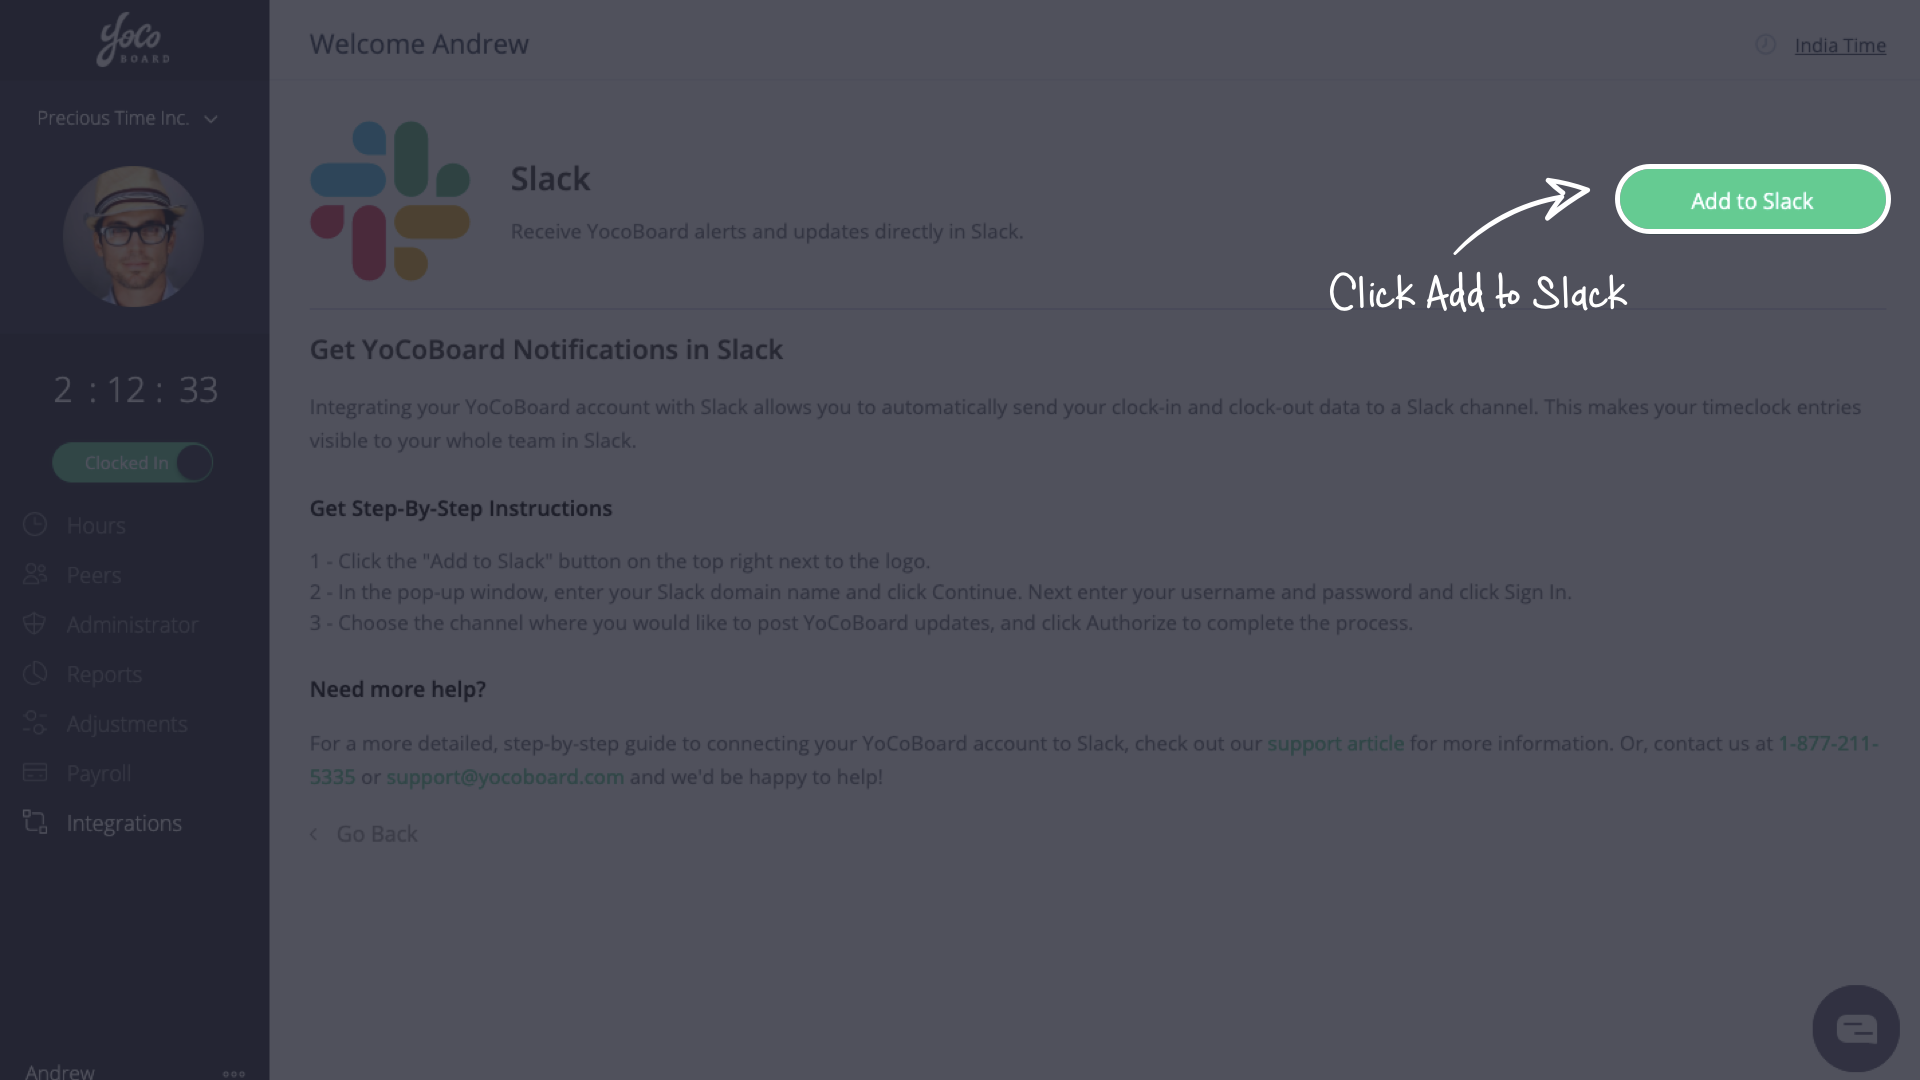
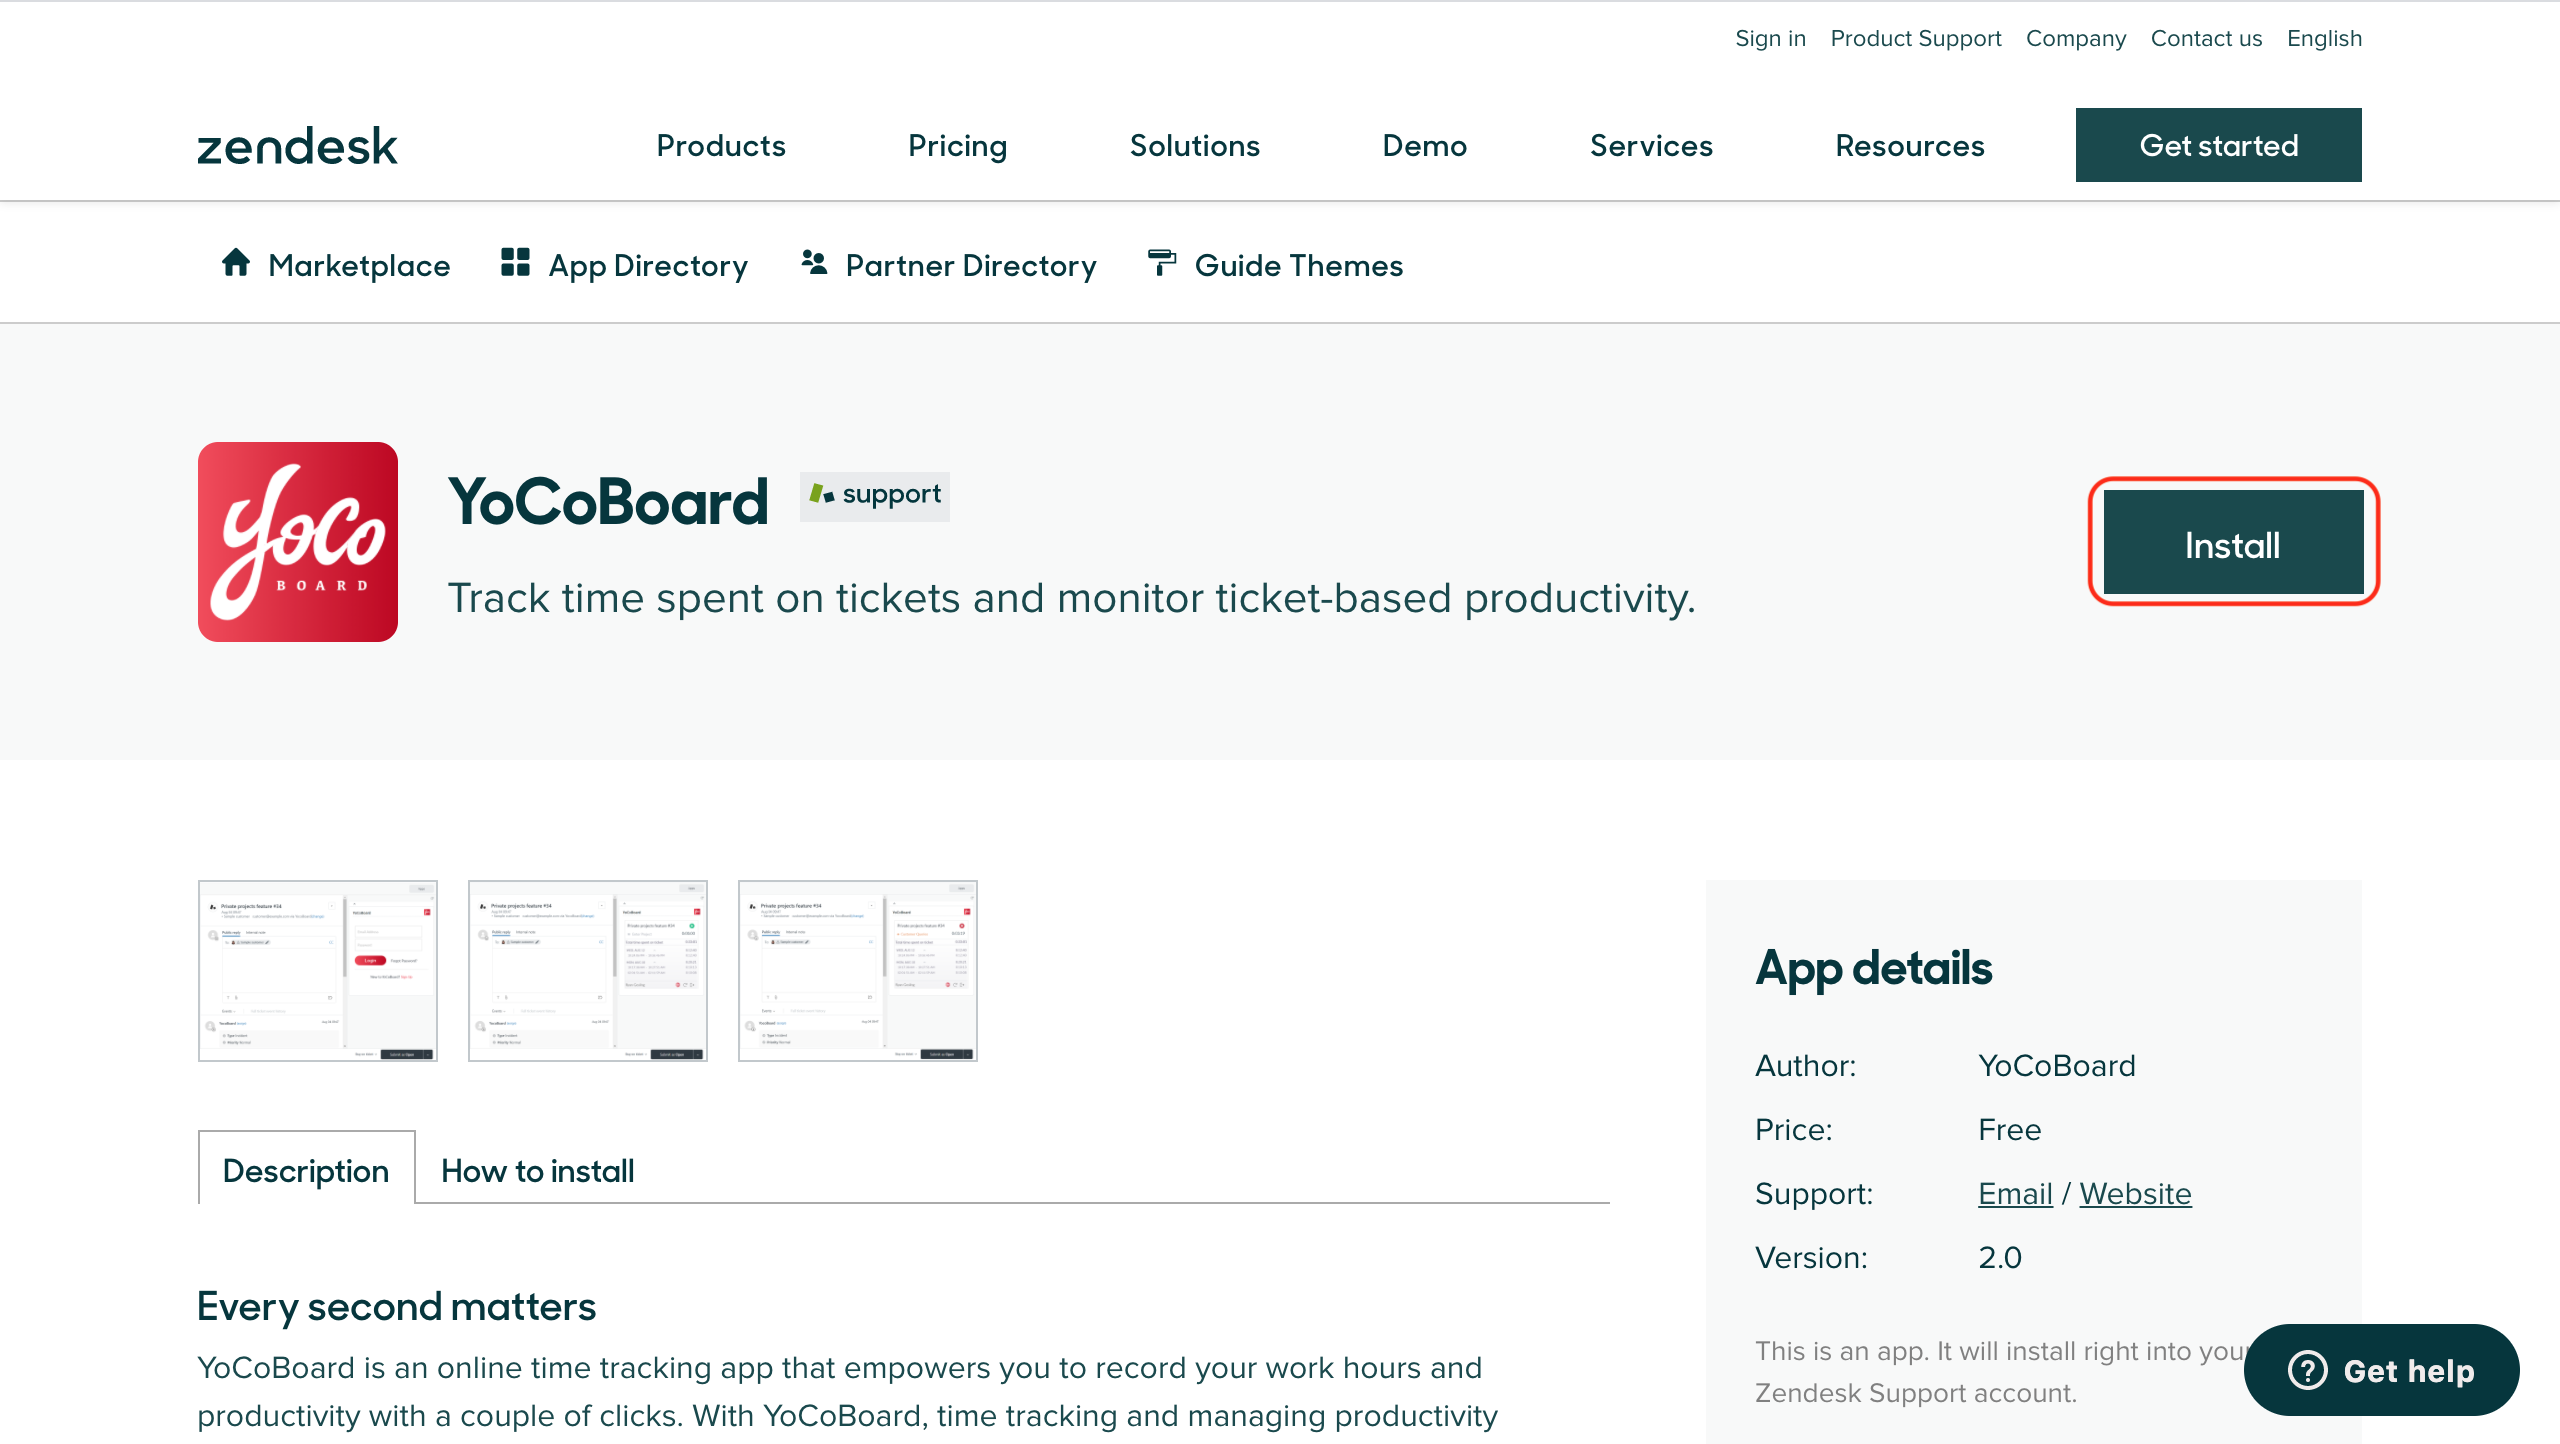
  • On the YoCoBoard sidebar, click Integrations and choose Zendesk.
  • Click the Add the YoCoBoard Widget button and you will be directed to the YoCoBoard widget page on Zendesk’s Marketplace.
  • Click the Install button to proceed.
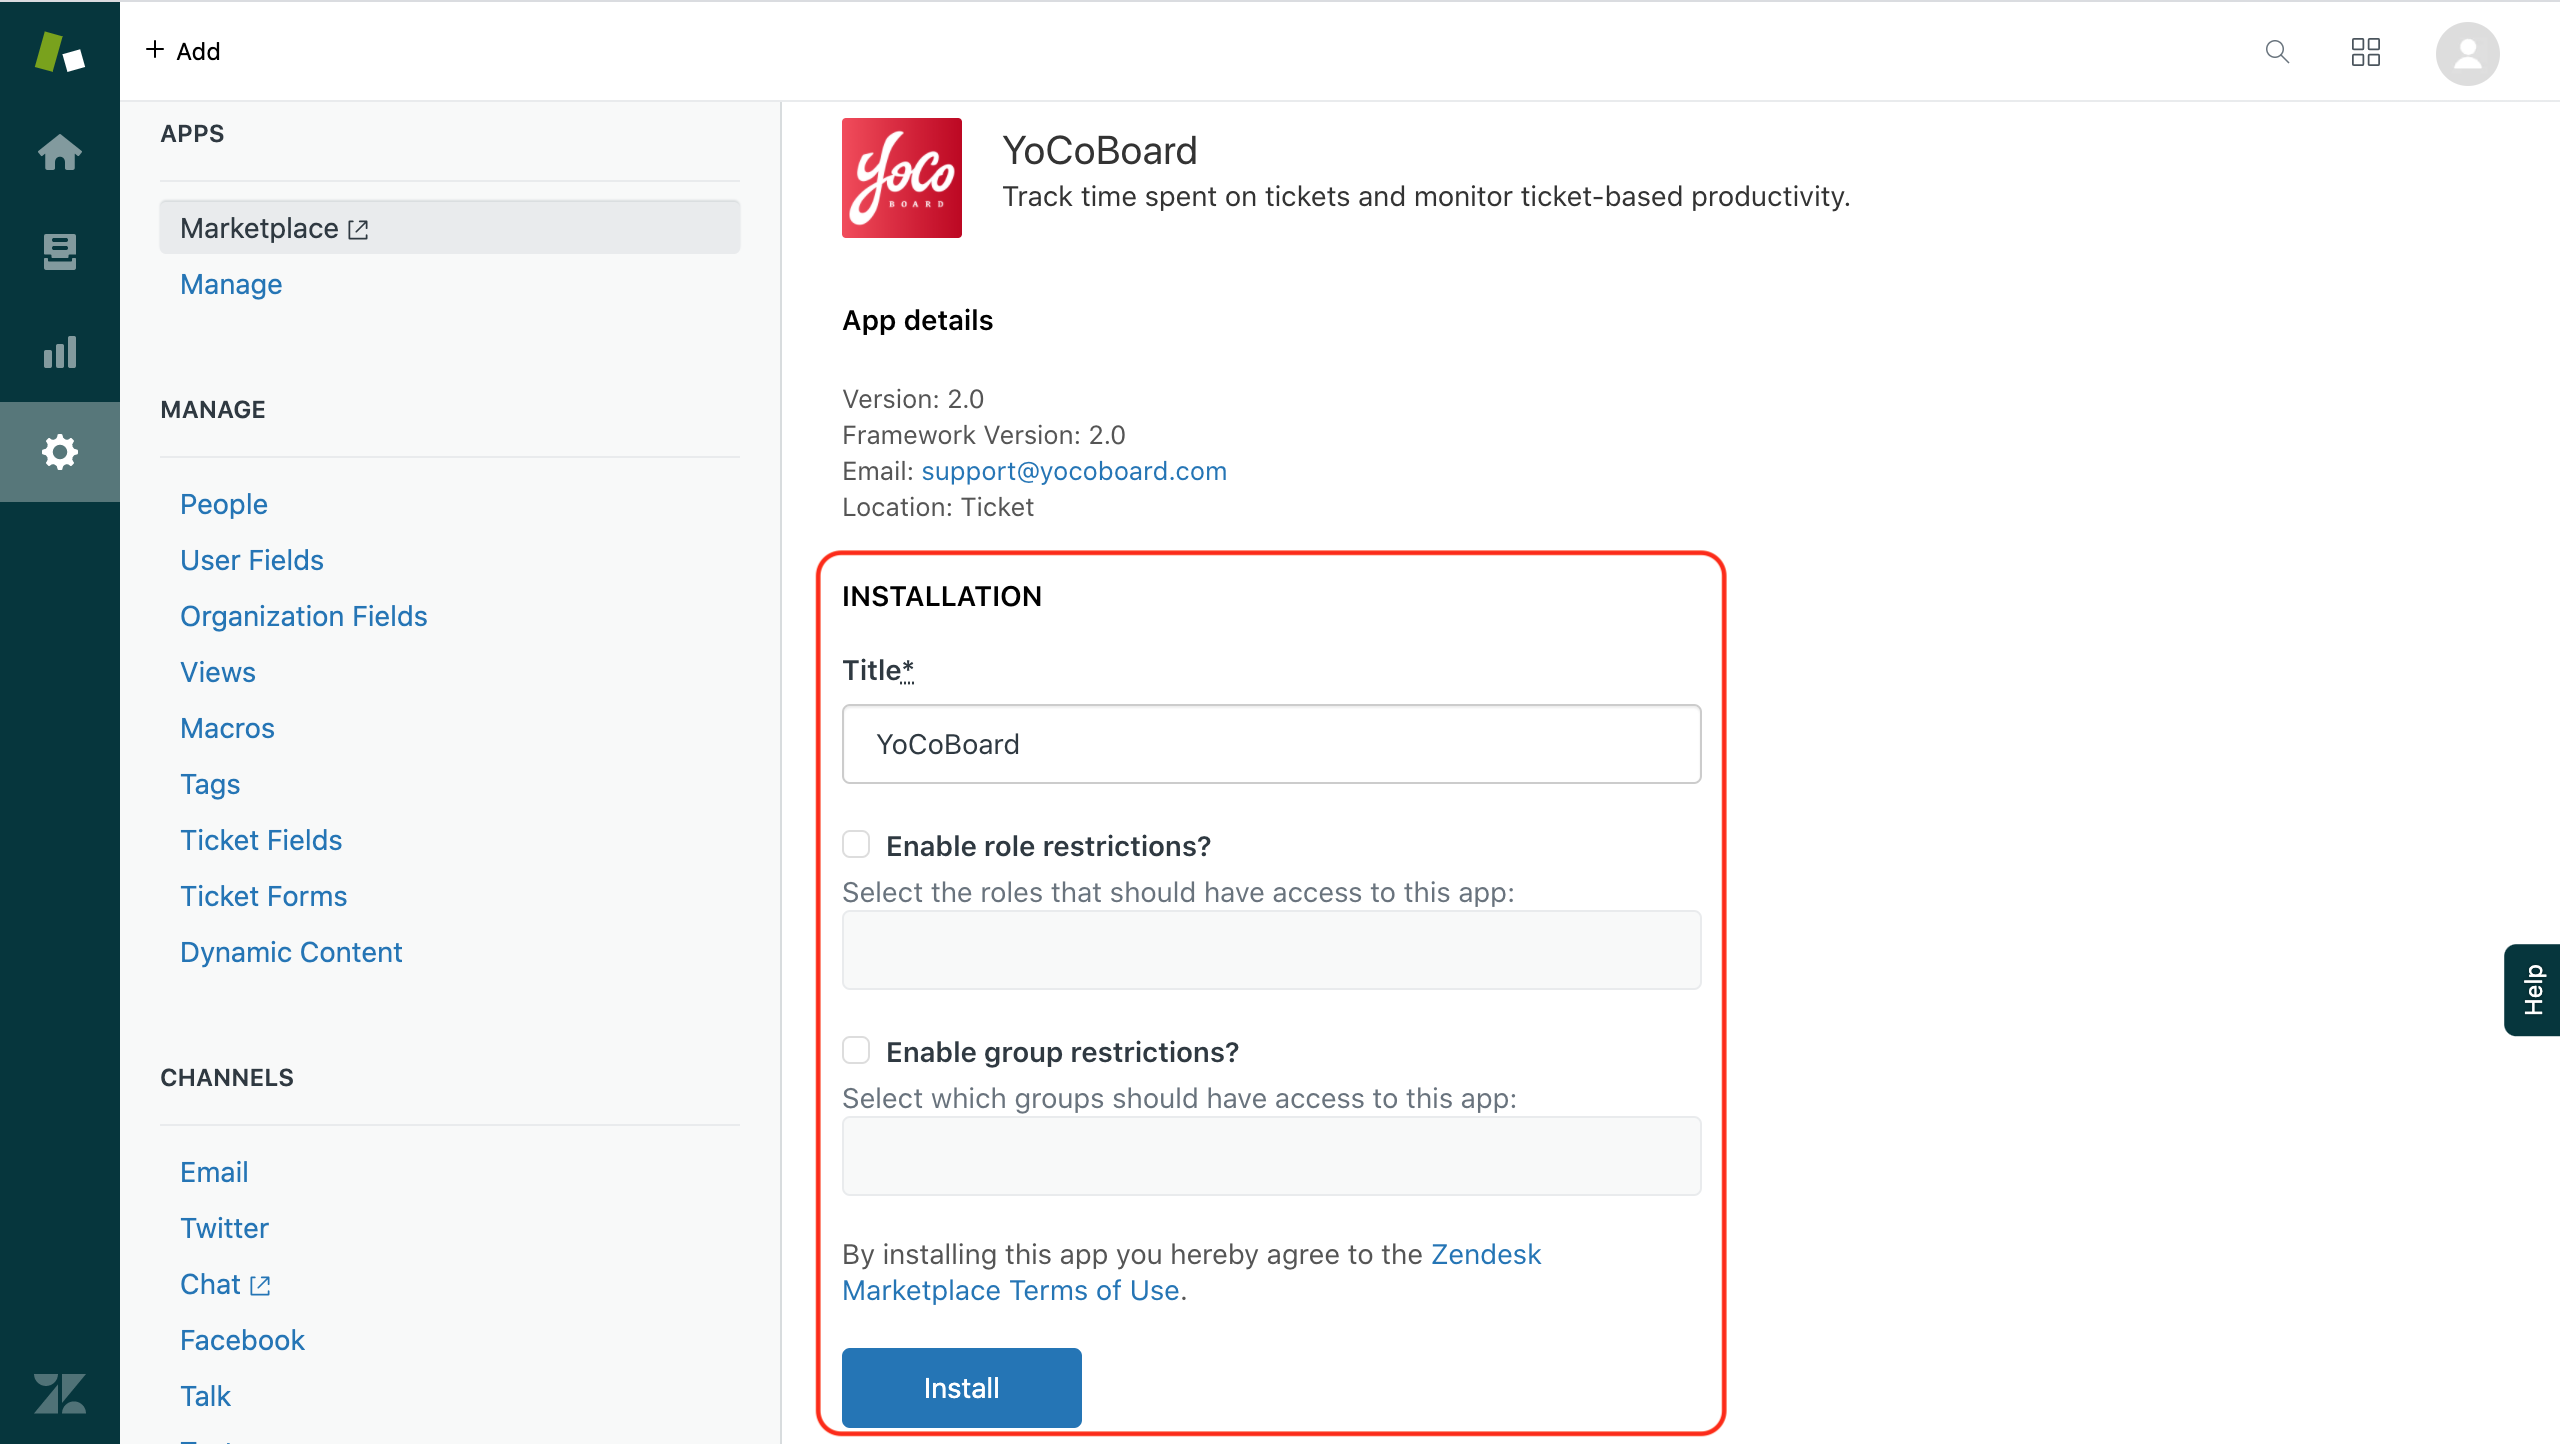
  • Log in to your Zendesk account to start the installation process.
  • Before the installation begins, you can add an integration title, enable role and group restrictions (optional).
  • When you enable role restrictions, you can assign roles to team members who can access the widget – Administrator or Agent.
  • When you enable group restrictions, you can specify the groups in Zendesk that can access the YoCoBoard widget.
  • Finally, click Install to complete the process.
  • After installation, the YoCoBoard widget will appear on your Zendesk dashboard under Admin > Manage > My Apps (Currently Installed).
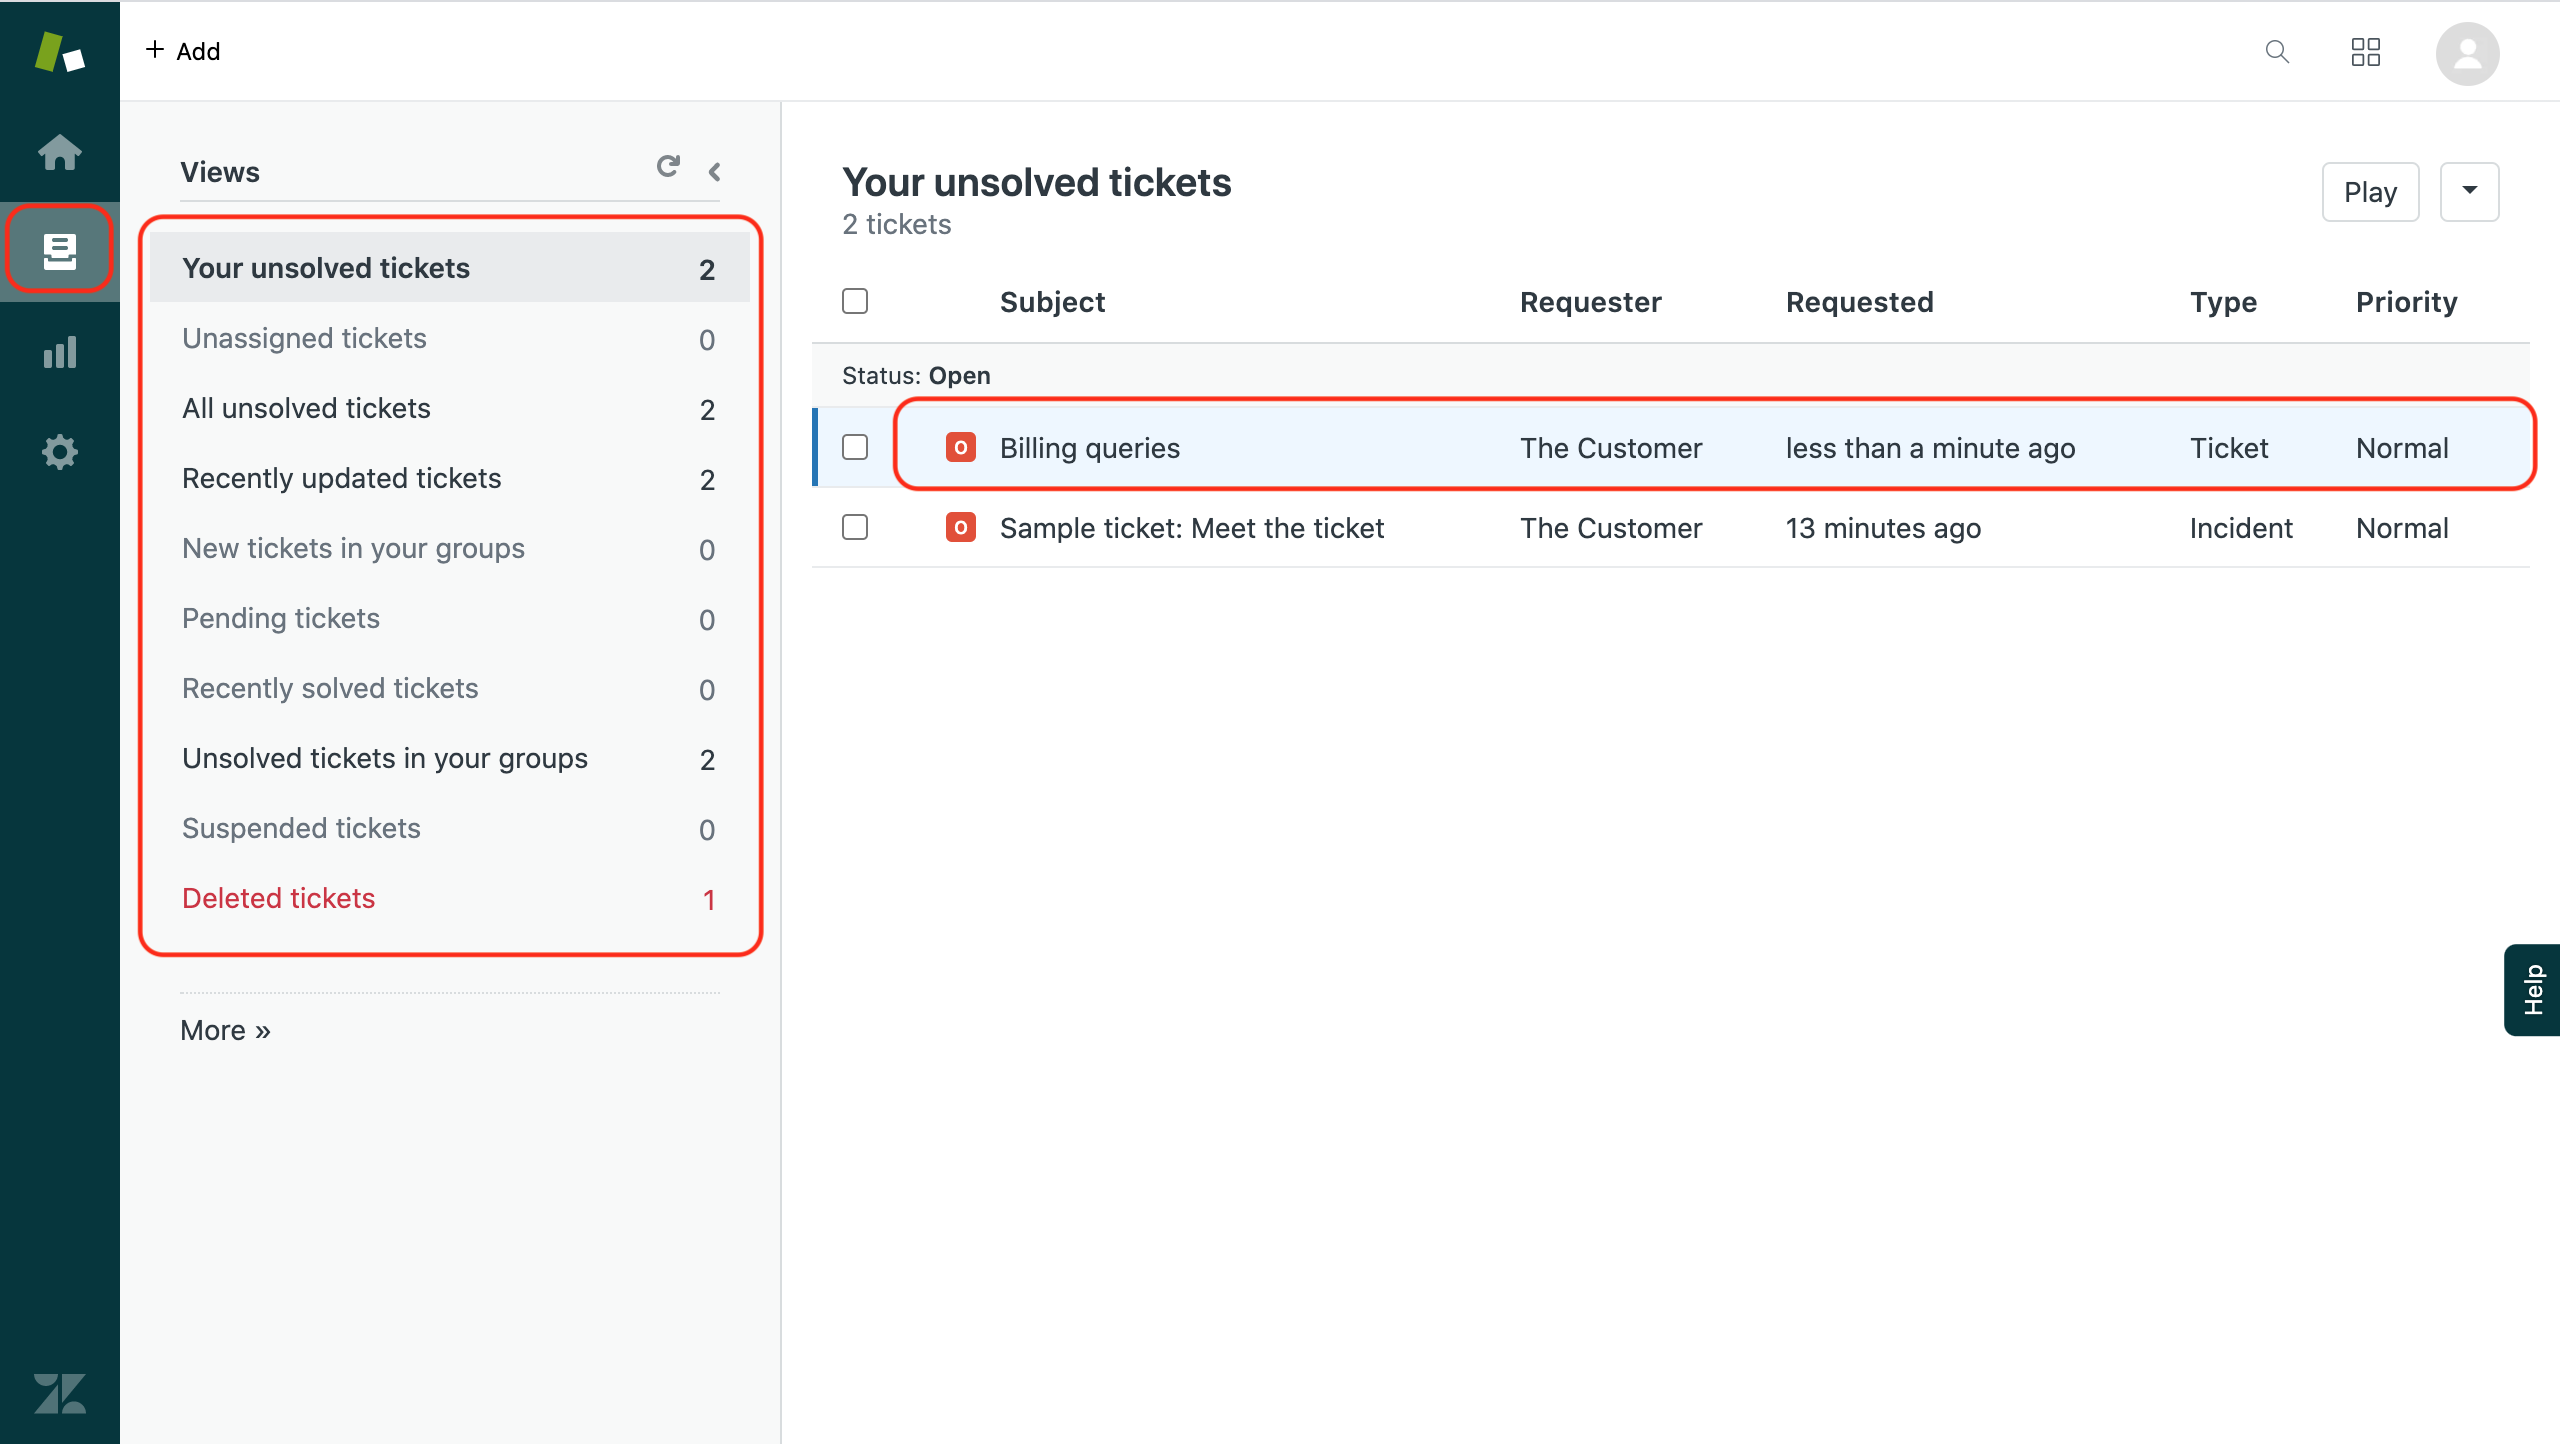
  • To use the integration, open Click views and select your ticket from a ticket category.
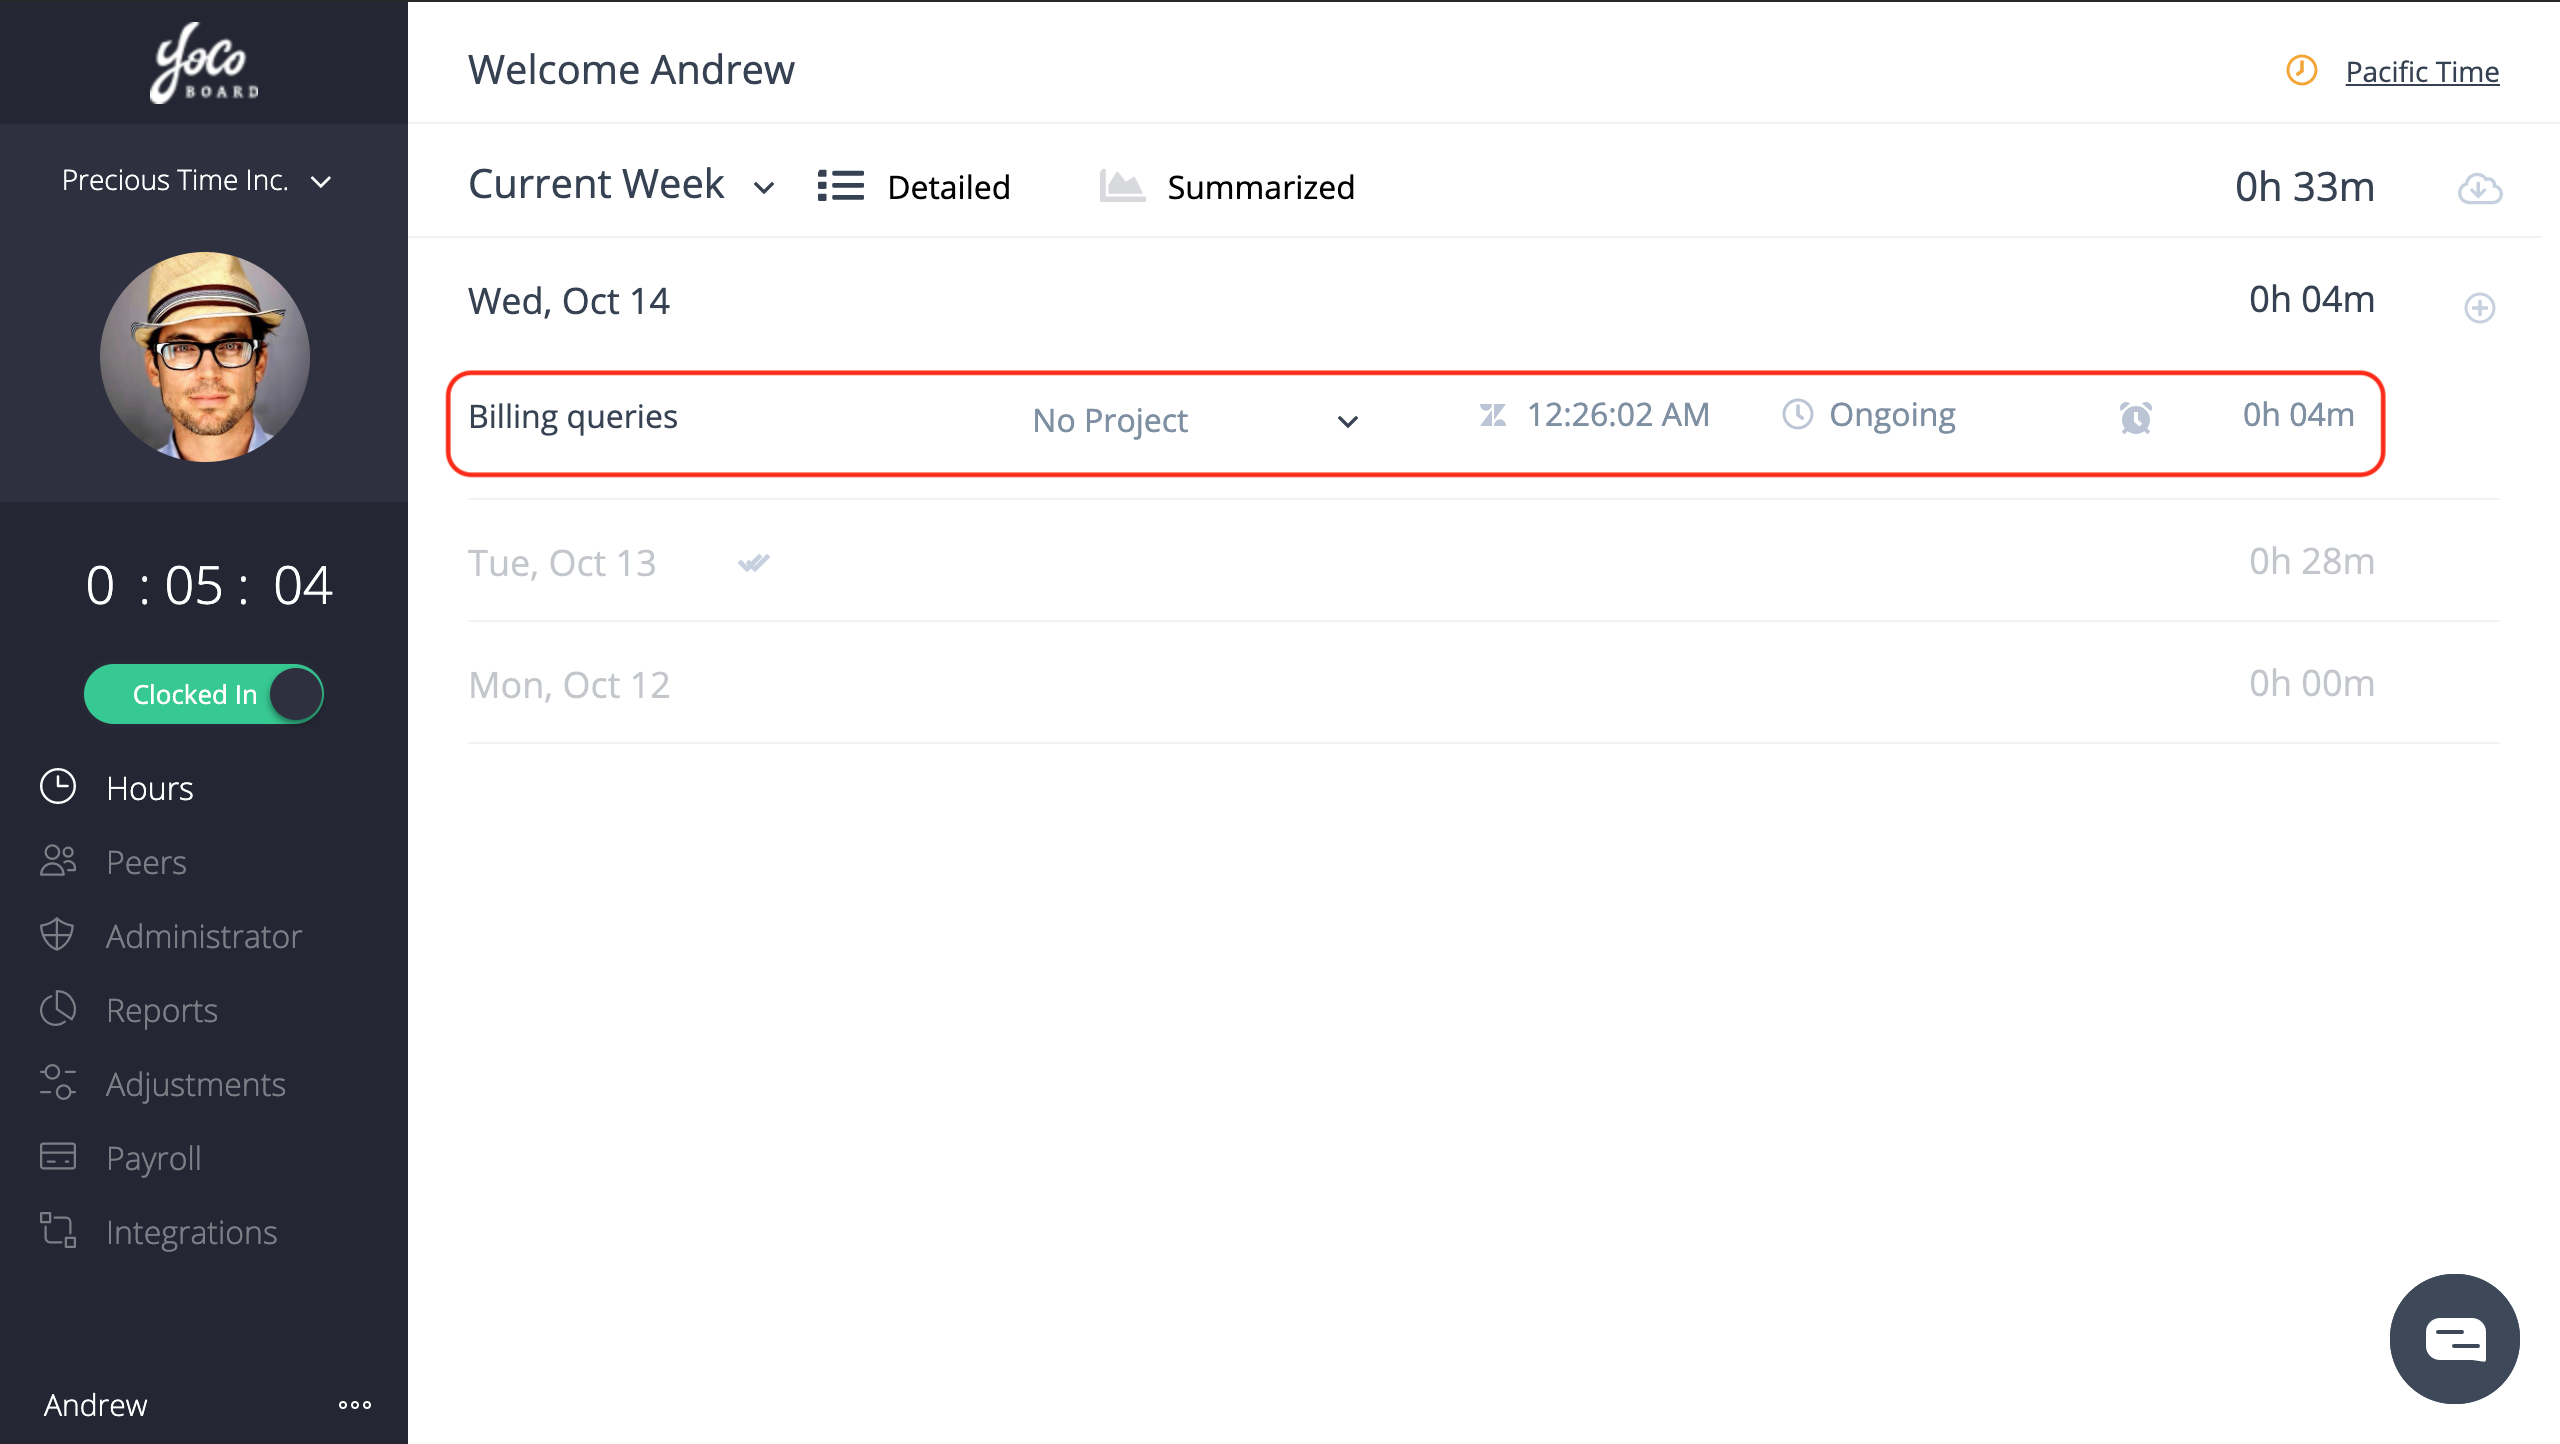
  • The YoCoBoard widget will appear on the right of your ticket window. You can start clocking the time spent on the Zendesk ticket.
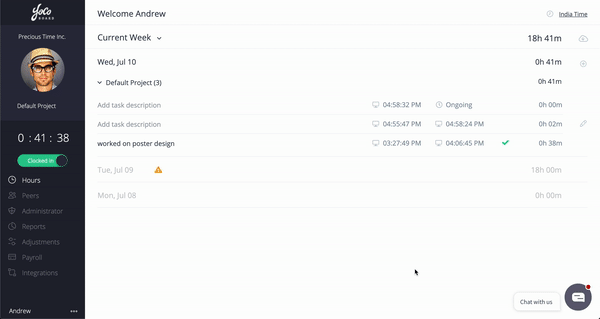
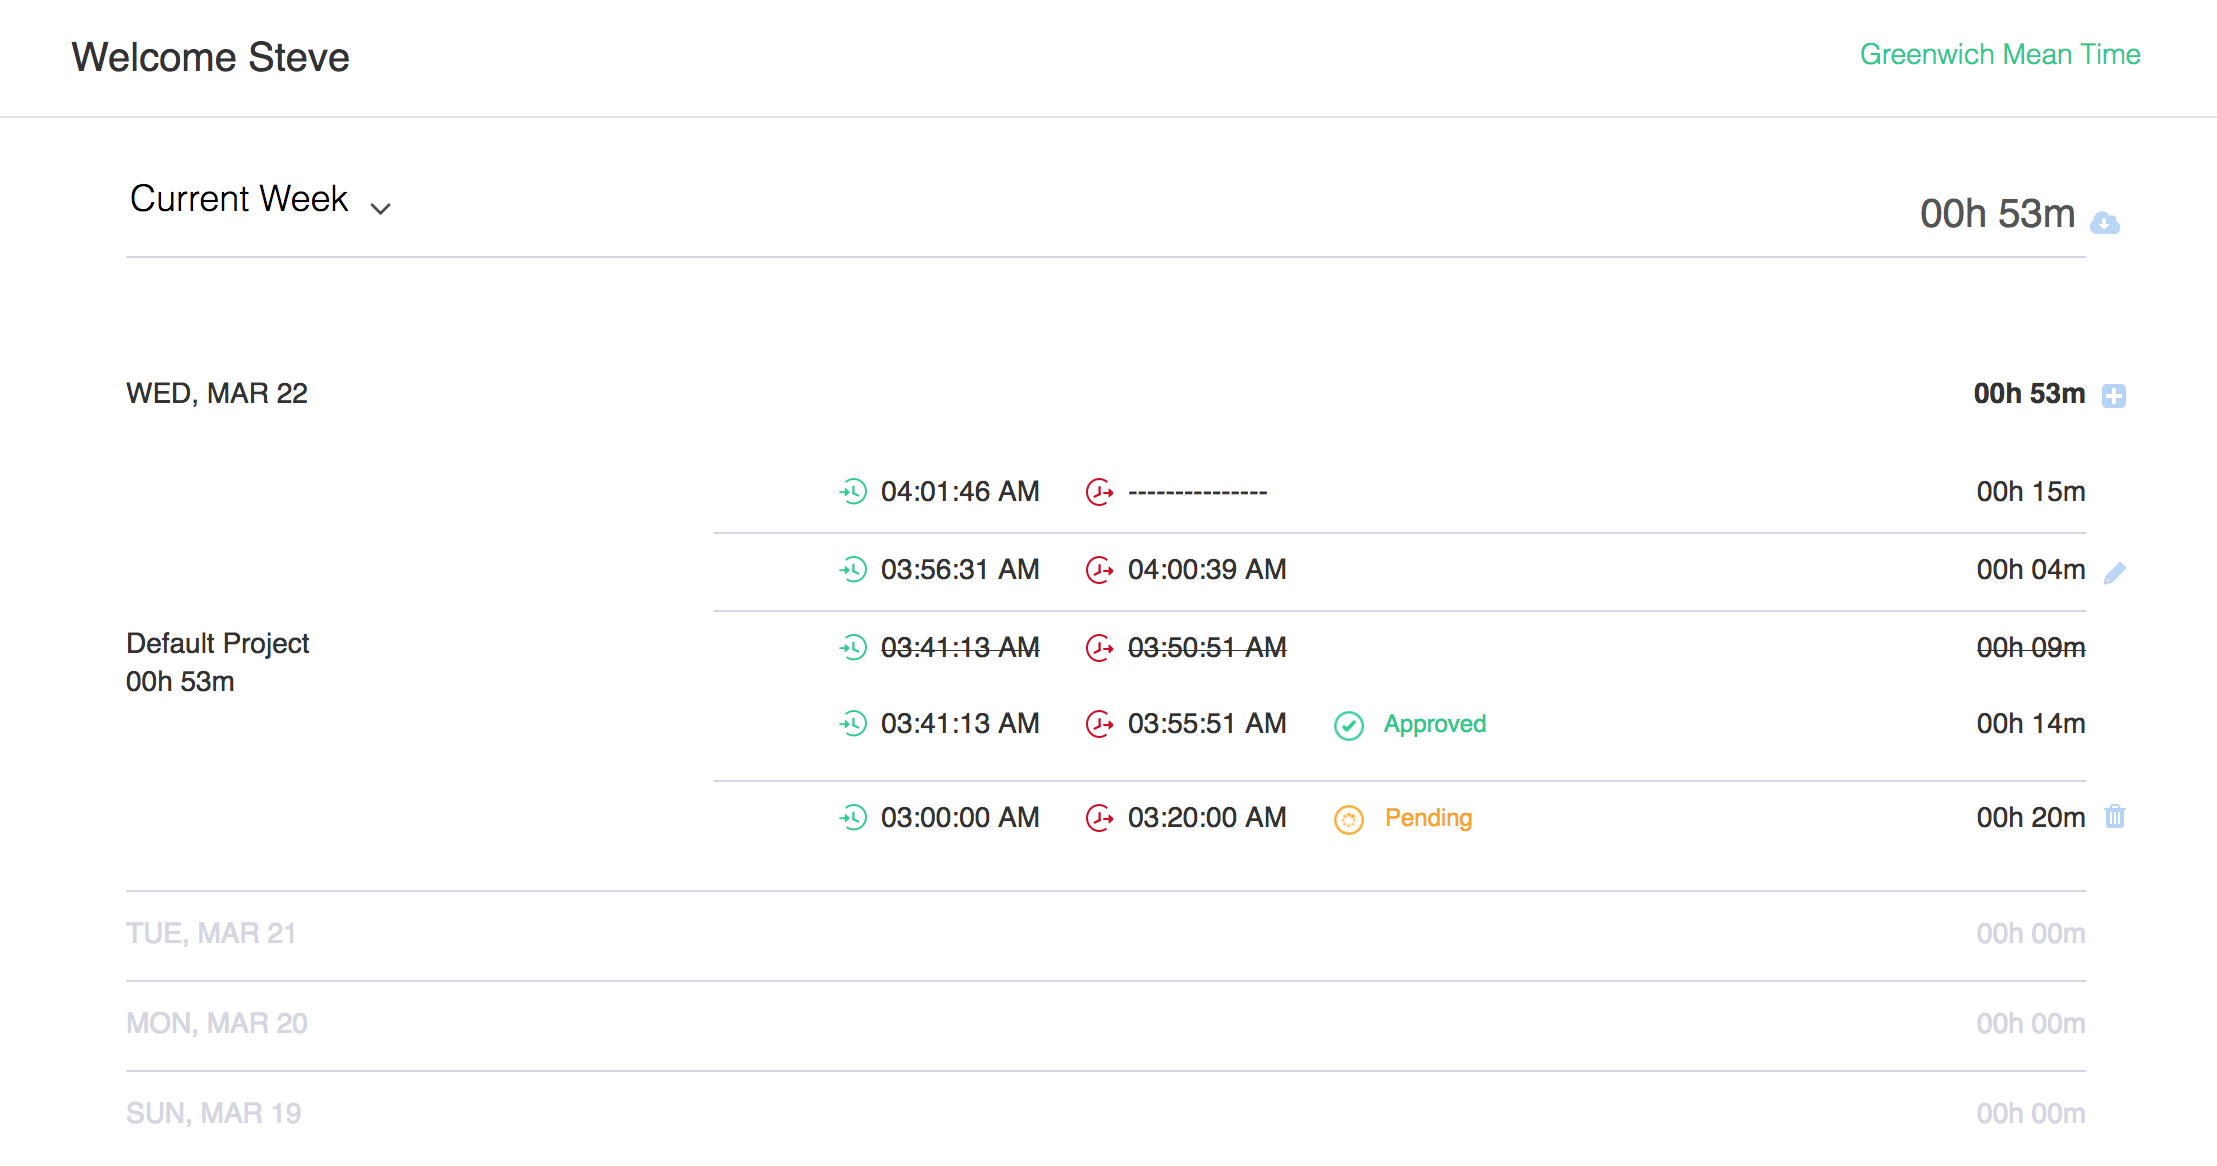
  • The time tracked on the Zendesk ticket will appear as a time entry on your YoCoBoard Hours page.

1.3 Deactivating the integration

  • When you click the Settings (gear icon) on the widget, you can disable it, change role and group restrictions or uninstall the widget.

Note: This integration can be deactivated only from Zendesk.

Posted in: Integrations

How to edit a time entry

July 1, 2017 3:30 am / Leave a Comment / YoCoBoard Admin

Sometime you need to edit a time entry, whether you created it by clocking in and out with the button or created it manually.

To edit an existing time entry, start on the Hours page.

Click the pencil icon on the right side of the line you want to edit.

In the window that pops up, you’ll see the info for the entry as it stands now. You can change the start time, end time, project or any other field you see there.

When you’ve entered the updated information, click Save.

In the gif below, we’ll see how to change the clock-out time for an existing entry and add a description for the change.


Posted in: Hours

How to add a time entry

July 1, 2017 3:21 am / Leave a Comment / YoCoBoard Admin

Sometimes, you might need to add a time entry manually rather than clocking in and out. For example, may be you forgot to clock in one day.

To add a time entry, select the day for which you need to add the entry.

Click the plus icon, at the right side of that day’s line.

In the window that pops up, add the start and end times for the entry, the project you worked on, and a description.

Click Save.

Your entry will show as Pending. The administrator of your account will review and approve the entry to make it official.

how-to-add-a-time-entry

Posted in: Hours

How to see your hours

July 1, 2017 3:09 am / Leave a Comment / YoCoBoard Admin

The hours you’ve spent clocked in on YoCoBoard are displayed on the Hours page.

There you’ll see your hours for the current week by default, but you can also check the previous week, the current month, or any custom date range you choose.

Each entry is displayed on its own line, and is independently editable. In addition you’ll see the total time for each day.

So, you might see an entry for four hours you worked in the morning, and another entry for another four hours you worked in the afternoon.

how-to-see-your-hours

Posted in: Hours

How to assign team members to a project

June 28, 2017 2:30 am / Leave a Comment / YoCoBoard Admin

YoCoBoard gives you two ways to add team members to a project.

First, let’s look at adding team members to a project from the team member’s profile.

Choose Administrator from the main menu. By default you’ll see a list of your staff members.

Click on the person you’d like to add to a project.

You’ll see that person’s profile pop up on the right side of the screen.

Choose Projects from the menu in the profile.

You’ll see the projects that person is currently assigned to. You can then choose Assign to Existing Project(s) to add the person to another project.

When you click on Assign to Existing Project(s) you’ll see the projects you’ve created on your account. The ones that the person is already assigned to will be lighter color, since you can’t add them twice.

Choose the project to which you want to add the person and click on the plus (+) icon for that project.

Click Save.

In the gif below, we’ll add Karan Thomson to our “Secret New Project“.

how-to-assign-team-members-to-a-project-1

The second way to add team members to a project is from the Project itself.

Start on the Administrator tab in the main menu, and then select Project.

You’ll see all the projects on your account listed.

Choose the project to which you want to add members.

You’ll see the members listed to the right.

Choose the plus (+) icon to add people.

Check the boxes next to any staff you’d like to add and click Save.

In the git below, we’ll add a few more team members to our “Secret New Project”.

how-to-assign-team-members-to-a-project-2

Posted in: Admin, Projects, Staff

How to change a team member’s profile and skills

June 28, 2017 2:07 am / Leave a Comment / YoCoBoard Admin

Each member of your YoCoBoard team has a profile consisting of their name, role, timezone, and employee id.

In addition, each member has a skill-set made of of toggle switches that can give them certain permissions, such as the ability to clock in and out from YoCoBoard mobile app or the ability to view and edit reports.

You can access and edit a given team member’s Profile and Skill-set by first clicking on their name in the Staff list on the Administrator tab. Then, use the Profile and Skill-set options to make your changes.

In the gif below, we’re giving Britney Allen, permission to clock in from the mobile app and to view reports:

how-to-change-a-team-members-profile-and-skills

Posted in: Admin, Projects, Settings, Staff

How to add a team member?

June 28, 2017 1:51 am / Leave a Comment / YoCoBoard Admin

To add a new member to your team, first choose Administrator from the main menu.

At the top of the staff list, choose Add Staff

Enter the person’s email, first name and last name, and then hit Save.

Your new staff member is now added! Now you can assign the team member to one or more teams, projects, adjust their skill settings and more!

how-to-add-a-team-member

Posted in: Admin, Staff

YoCoBoard-Slack Integration

June 20, 2017 12:11 pm / Leave a Comment / YoCoBoard Admin

Get Clock in/out alerts in your Slack Channel

Extend the time tracking functionality of YoCoBoard to your team collaborative app, Slack. The YoCoBoard-Slack integration posts alerts to your Slack channel when a team member clocks in or clocks out.

Note: Your Slack team members must Sign up on YoCoBoard and activate this integration to have their hours tracked.

1.1 Activating the Slack integration

  • On the YoCoBoard sidebar, click Integrations and select Slack.
  • Click the Add to Slack button in the integration window.
  • Choose your Slack Workspace and your Slack Channel. Click the Allow button to continue.
  • You can now open your Slack dashboard and check if YoCoBoard has been added to your channel. 
  • On your Slack sidebar, click Apps.
  • You will find YoCoBoard listed as part of your Slack Workspace.
  • Now, when you clock in or clock out on YoCoBoard, your Slack channel will receive the alerts. Users who are part of this channel will also be able to see these updates.
  • On the YoCoBoard Integrations page, a tick mark on the Slack integration card indicates that the integration is active.


1.2 Deactivating the Slack integration

  • On the YoCoBoard sidebar, click Integrations and select Slack.
  • Click the Deactivate button to deactivate the YoCoBoard-Slack integration.


If you have questions and need further assistance, please write to our support and we’d be happy to help!

Posted in: Integrations, Slack

YoCoBoard-Zapier Integration

June 13, 2017 6:52 pm / Leave a Comment / YoCoBoard Admin

Access the Zapier Ecosystem

Zapier lets you connect YoCoBoard with different apps present in its ecosystem. You can create a Zap, define the trigger and select an action to export a time entry from YoCoBoard to a Google sheet.

Note: 

  1. Use Zapier to integrate YoCoBoard with Google Sheets or Slack. We are working on connecting more apps in the ecosystem with YoCoBoard. 
  2. YoCoBoard will only export time tracking data to connected apps in a zap and cannot import data currently.

1.1 How to activate the integration

  • Log in to your Zapier account.
  • Type “YoCoBoard” in the Connect this app… search bar and click it when it appears.
  • Zapier displays all the apps that can connect with YoCoBoard. Select your app from the list. Let’s go with the Google Sheets.
  • Enter “Google Sheets” under the “with this one!” field.
  • Setting up a trigger
    Now, choose a YoCoBoard trigger under When this happens… field. The only trigger you can select here is New Clock Entry.
  • Setting up an event
    The next step is to choose an action event from then do this! field. Click the drop-down menu to choose from the list of action events. Click the Use Zap button to proceed.
  • On the next page, click the Sign in to YoCoBoard button.
  • Key in your sign-in credentials and click the Yes, Continue button.
  • Choose the YoCoBoard Account (Company), you want this integration to be associated with and click CONTINUE.
    #Tip: You can edit the integration title by clicking anywhere on the title bar.
  • You can now test your connection by clicking TEST & REVIEW or TEST & CONTINUE.  Alternatively, you can also click SKIP TEST.
  • Recheck the details on your connected app and click CONTINUE.
  • Your imagination is now ready but it needs to be activated. Activate it by pushing the toggle button to ON.
Posted in: Integrations, Zapier

Hours

March 22, 2017 9:28 am / Leave a Comment / YoCoBoard Admin

Hours page is where you can see your time records listed out. This page also lists out the current running session (if any). Also on this page, you can see your time records with their equivalent adjustments (if any).

Screen Shot 2017-03-22 at 4.19.55 AM

Posted in: Basics

Post Navigation

« Previous 1 2 3 4

Recent Posts

  • The YoCoBoard Firefox Add-on
  • View & Generate Reports
  • Manage Adjustment Requests
  • Change Staff Skill-set
  • Change Staff to Admin

Categories

  • Account Settings (3)
  • Admin (11)
  • Asana (1)
  • Basics (8)
  • Browser Extension (1)
  • Client (1)
  • Companies (1)
  • Confirm Time Entries (1)
  • General Settings (5)
  • Getting Started (2)
  • Hours (7)
  • Integrations (5)
  • Payroll (1)
  • Peers (2)
  • Projects (5)
  • Projects Association (2)
  • Quick Start Guide (4)
  • Reports (2)
  • Settings (6)
  • Slack (1)
  • Staff (10)
  • Team (4)
  • Time Adjustment (3)
  • Trello (1)
  • Zapier (1)
© Copyright 2025 - YoCoBoard - Support
Infinity Theme by DesignCoral / WordPress