• Home
  • Blog
YoCoBoard – Support

View Peers

February 27, 2020 6:11 pm / 2 Comments / YoCoBoard Admin

See Who’s Online

The Peers page displays all the peers who are clocked in at a given time. When you have team members from across the world, you can view team members who are active at a given point in time, the duration of their current session and region-wise distribution of peers.

#Tip: Connect YoCoBoard to a large external display and view who’s clocked in even before stepping in!

1.1 How to view your peers

  • On the YoCoBoard sidebar, click Peers to see who’s online. By default, you can see the profile image of the peers who are clocked in (Grid view).
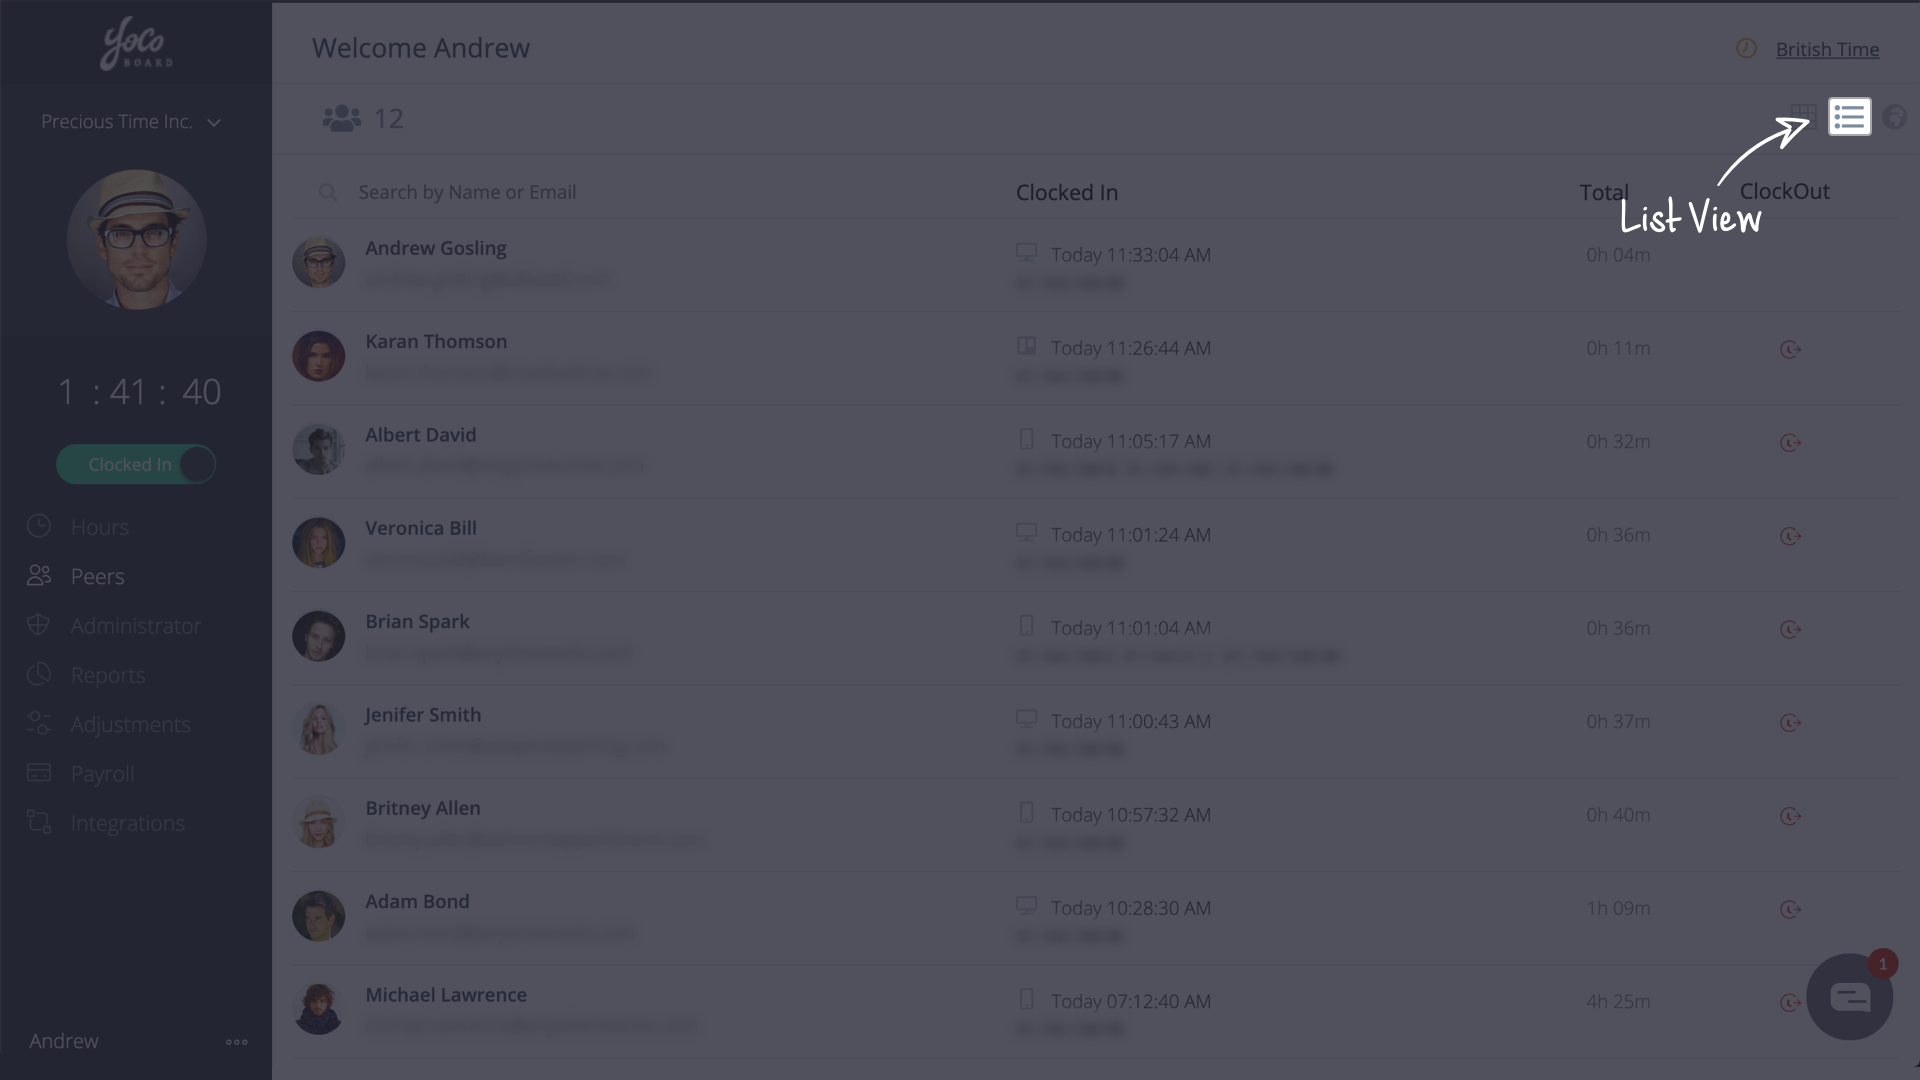
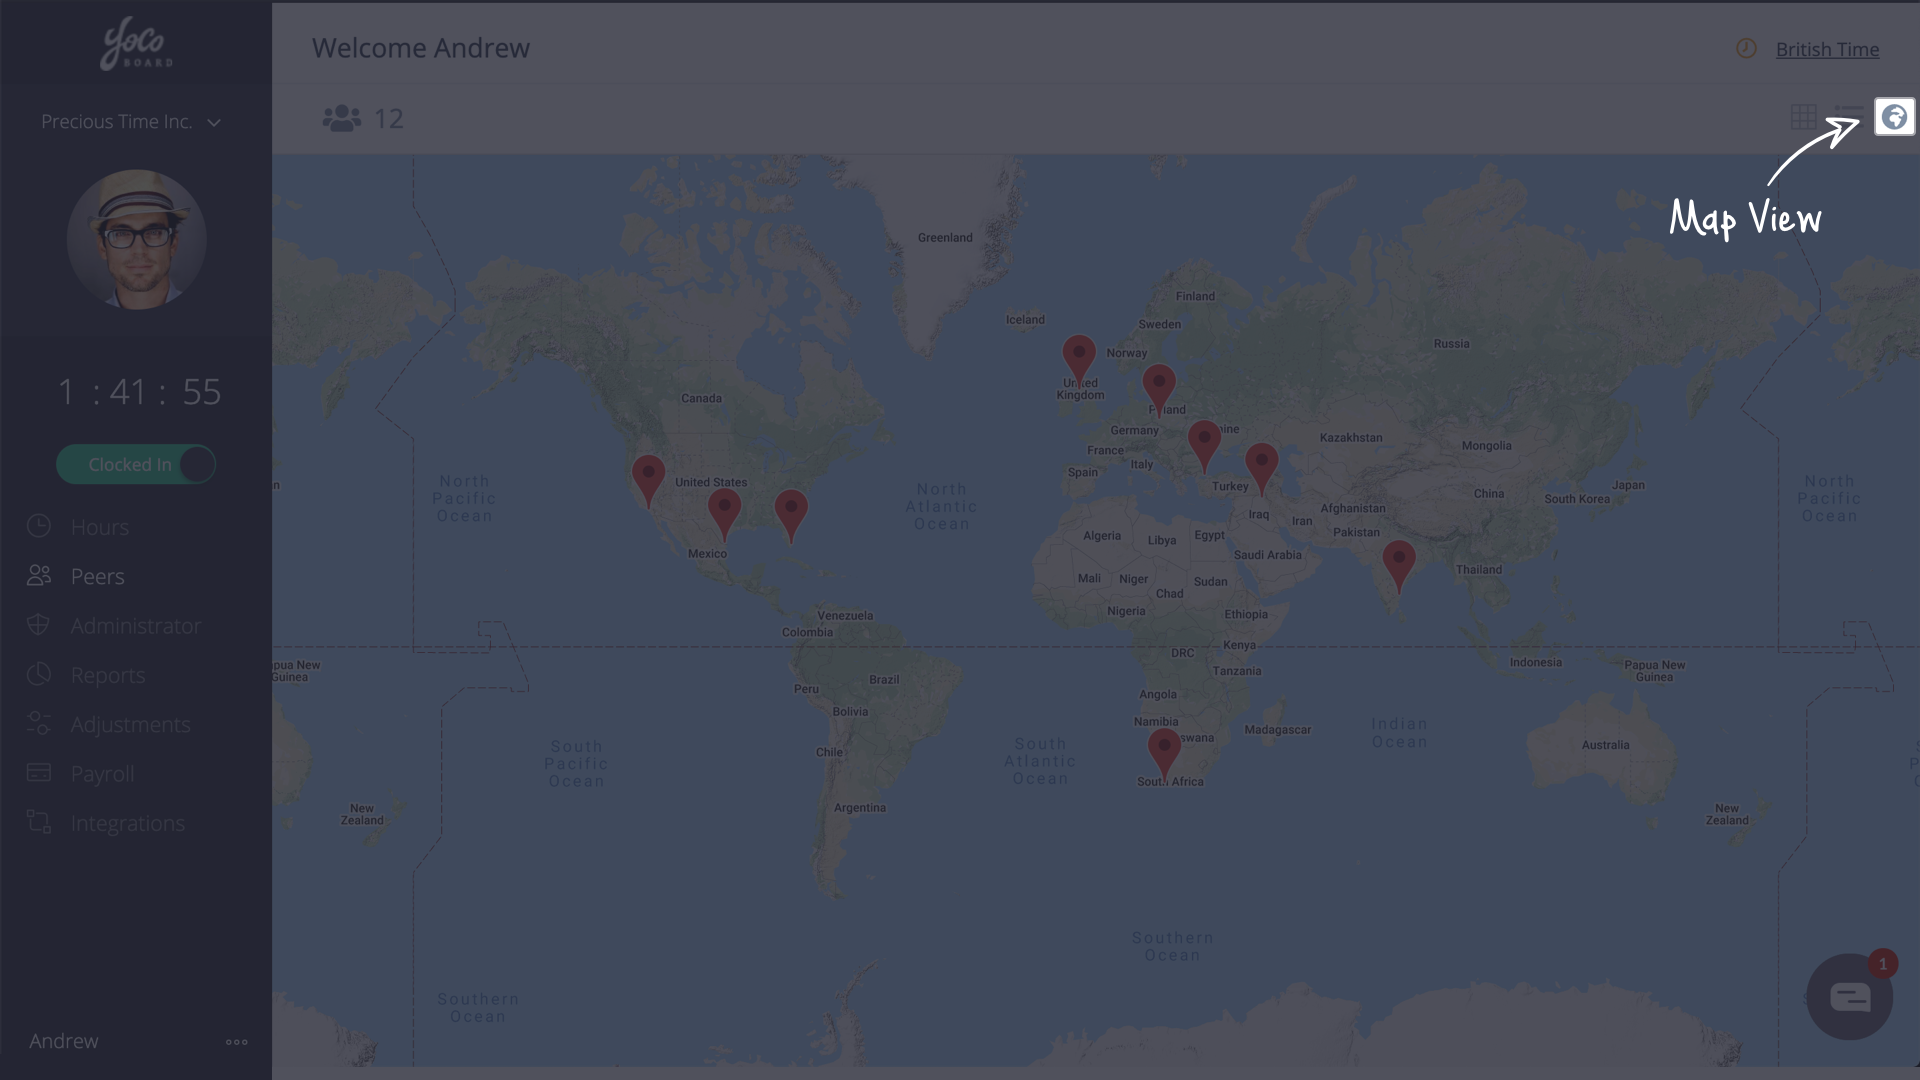
  • Click on the icon right below the time zone to switch between the different views available for the Peers tab.
  • The Grid view displays the thumbnails of active staff in chronological order.
  • The List view is more detailed with information like the staff’s email address, time entry and total hours worked.
  • The Map view pins the locations of staff on a map helping distributed teams know their location.

Posted in: General Settings, Peers

Change Time Zone

February 27, 2020 5:35 pm / Leave a Comment / YoCoBoard Admin

Auto-Detect & Manual Setting

While tracking time, it is important that your profile is configured to the geographical time zone of your area. This simplifies the way you track time especially if you are part of a distributed team or if you work for clients from another region. YoCoBoard auto-detects time zone based on your location and updates accordingly. You can also manually select a time zone from the list.

In addition to that, your clients can view your clocked-in sessions in their local time (Admin feature).

1.1 Choosing a time zone manually

  • Click the time zone on the top-right corner of your YoCoBoard dashboard. 
  • On the pop-up window, select Pick from the list, choose your time zone and click Update. 

Note: If the time zone you select, doesn’t match the auto-detected time zone, a time zone mismatch icon appears on the app top bar. You may: 

  • Click the icon and update to the system detected time or you can ignore the warning. 

Posted in: Basics, General Settings, Hours

Clock In & Clock Out

February 27, 2020 2:51 am / Leave a Comment / YoCoBoard Admin

Tracking Work Hours

YoCoBoard makes time tracking easy with its one-click tracking. The single-click tracking starts with the web app and is also incorporated into integrations like Slack, Trello, Asana and also to the YoCoBoard Chrome extension.

1.1 How to clock in & clock out

  • On the YoCoBoard sidebar, click the toggle bar to clock in. 
  • When clocked in, the button turns green and the timer will actively record your session.
  • To clock out, click the active toggle button. The button will grey out and the time will stop, indicating that a session is over. 

Posted in: Getting Started, Hours, Quick Start Guide

Manage Your Profile

February 27, 2020 1:10 am / Leave a Comment / YoCoBoard Admin

Update Profile Information

Every time you clock in, your YoCoBoard profile picture appears in the Peers page. This helps your team members know whether you are clocked in. The profile page also makes is seamless for new members to integrate with the team or for a distributed team to collaborate easily.

The profile page lets you upload a profile picture, update your password and edit your first and last name.

1.1 How to access your profile

  • At the bottom of the YoCoBoard sidebar, click the more option ( 3 dots ) icon next to your name. 
  • Choose My Profile from the list. 
  • Click Change Photo to upload a profile picture, enter your First Name, Last Name and click Save. 

Note: Your email address is also the login ID for YoCoBoard and thus cannot be edited.

Posted in: Basics, Quick Start Guide, Settings

Staff Sign Up – Email Invitation

February 19, 2020 6:26 pm / Leave a Comment / YoCoBoard Admin

Accepting Invite & Signing Up

When you sign up as a staff member, you become part of your company’s account on YoCoBoard. You can track your work hours or projects, you are part of with a click. YoCoBoard maintains a complete record of your tracked hours that can be used by the super admin to calculate your billable hours.

You can use your YoCoBoard account to clock in and clock out via the YoCoBoard web app, Android app or the iOS app.

1.1 Sign up using email invite

  • Open the YoCoBoard invite email, click on the Accept Invite button. Please note that the email address to which this invite was sent will be your YoCoBoard login ID.
  • You will be redirected to the YoCoBoard sign up page Create a password for your account. 
  • Now, use the login email address and password you created to sign in. You’ll be taken to YoCoBoard’s dashboard page, where you can clock in.
Posted in: Basics, Quick Start Guide, Staff

Create a YoCoBoard Account

December 5, 2019 6:47 am / Leave a Comment / YoCoBoard Admin

The Sign-Up Process

YoCoBoard is a tracking application for anyone. With YoCoBoard, you and your team can track work hours or time spent on individual projects. You can log your working hours with a click or a tap from Anywhere. Confirm the clocked work hours and generate reports that make payroll simple.
You can create an account on YoCoBoard ( sign up ) with your:

  • Email address
  • Facebook/Google account

Here’s a brief walkthrough describing the signup process.

1.1 Sign up with email

  • Open https://www.yocoboard.com/signup
  • Type your Full Name, Email Address and enter a Password.
  • Click the Create an account button. 
  • You will now be logged into the YoCoBoard dashboard.
    Dashboard

1.2 Sign up with your social profiles

  • Open https://www.yocoboard.com/signup
  • To user your Google account to sign up, click the “G” button.
  • Enter the email and password for your Google account to sign in and create an account.
  • To use your Facebook account to sign up, click the “F” button.
  • Enter the email and password of your Facebook account and click Log In.
  • You will now be logged into the YoCoBoard dashboard.
Posted in: Admin, Basics, Getting Started, Quick Start Guide

Associate Time Entries to Projects

November 22, 2019 5:12 am / Leave a Comment / YoCoBoard Admin

Choose between Projects

Most YoCoBoard users want a time tracker – nothing more, nothing less. We let you do just that – clock in when you need to and clock out when you’re done and YoCoBoard will record your time entries. Simple. But there are times when you are working on different projects and you want your time entries to reflect that.

By associating your time entries to a project, you can map your time entries to the projects directly on the Hours page. You will find projects you are part of, listed in the drop-down menu.

1.1 How to associate time entries

  • On the YoCoBoard sidebar, click Hours.
  • Select the relevant date and time entry to choose your project from the drop-down menu.
  • If not listed, enter the name of the project in the search bar and log the time entry to your project.
Posted in: Basics, Projects Association

YoCoBoard-Asana Integration

February 11, 2019 3:17 am / Leave a Comment / YoCoBoard Admin

Time Your Asana Tasks

Asana lets you organize your projects and makes teamwork easy. The Asana- YoCoBoard integration lets your team track time that’s spent on Asana tasks with just a click. The integration embeds a YoCoBoard widget inside your tasks so that your team can clock in and out without leaving Asana.

Note: This widget will only work with a Google Chrome browser.

1.1 Installing the extension

  • On the YoCoBoard sidebar, select Integrations, select the Asana card and click the Add to Asana button. You will now be directed to the Google Chrome web store.

  • Click on Add to Chrome to download the YoCoBoard extension to your Chrome browser.

  • A pop up will notify you about access conditions for this extension. Click the Add extension button.

  • Click the stopwatch icon on your browser to open the tracker pop up. You will need to login with your YoCoBoard account credentials if this is the first time.


1.2 Track time on Asana

  • Open your Chrome browser and click on the More Options (3 dots) icon, select More Tools > Extensions.

  • Here will be a list of all extensions. Find the YoCoBoard extension card and click the Details button.

  • Scroll down to find Extension Options and click the preview icon to view the extension.

  • Tick the asana.com checkbox and click Allow on the permission pop up.
    Note: To stop tracking your Asana tasks, just untick the asana.com checkbox.

  • Login to your Asana account from your Chrome browser. On your Asana sidebar, click My Tasks and choose any task.
  • On the right window, click the YoCoBoard widget at the top to clock in or clock out.

  • All your time tracking information can be found in the Hours page of your YoCoBoard account.


1.3 Deactivating the Integration

  • To deactivate this integration, open your Chrome browser and click on the More Options (3 dots) icon and choose More Tools > Extensions.

  • In the list of active extensions, find the YoCoBoard extension card and click the Details button.

  • Scroll down to find Extension Options and click the preview icon to view the extension settings.

  • Uncheck the asana.com checkbox and your integration will be deactivated.
    Note: You can still use the browser widget to clock in and clock out of YoCoBoard (optional).


Posted in: Asana, Integrations

Create Teams in YoCoBoard

September 17, 2018 3:06 am / Leave a Comment / YoCoBoard Admin

You can create teams in YoCoBoard to group members who work in the same departments. Creating teams helps you to organize people making it easy for new-joinees to learn who-is-who.

From inside your account, navigate to the sidebar on the left and click Administrator.


Click the Team tab and select +Add Team to proceed.


Enter the team name and start adding members to the team by choosing them from the provided list.

Note: Only members who are part of your organization in YoCoBoard will be listed. If you cannot find a staff member, you can invite them to join your organization on YoCoBoard.

Once you finalize all the members, click the Save button.

Once a team is created, you can update the name by clicking the edit icon next to the team’s name.

You can delete members by clicking the encircled  – ( minus) symbol that appears next to the team member.


You can appoint one of the members of the team as a Team Owner. First, click the team name to view members in the team.

Next, click the crown icon next to the name of a member to mark them as an admin. Choose confirm in the pop-up that opens.

Note: Each team can have only one Team Owner. You can swap ownership from one member to another by clicking the crown icon.


Posted in: Team

YoCoBoard-Trello Integration

August 9, 2017 3:34 am / 2 Comments / YoCoBoard Admin

Track time spent on Trello cards

Trello helps you create cards to manage your projects and track their journey, from start to finish. The YoCoBoard widget helps you track time spent on each Trello card. Your team can log their work hours spent on Trello cards without switching between YoCoBoard and Trello app.

Note: This integration requires the YoCoBoard Chrome extension to work.

1.1 Installing the extension

  • On the YoCoBoard sidebar, select Integrations and click the Add to Trello button. You will now be directed to the Google Chrome Web Store.

  • Click on the Add to Chrome button to add the YoCoBoard extension to your Chrome browser.

  • In the confirmation pop-up, click the Add extension button to proceed.

  • Click the stopwatch icon on your Chrome browser to open the tracker pop up. Enter the YoCoBoard account credentials.


1.2 Tracking time on Trello

  • On the Chrome browser go to More Options (3 dots) > More Tools > Extensions.

  • In the list of active extensions, find the YoCoBoard extension card and click the Details button.

  • Scroll down to find Extension Options and click the preview icon to view the extension settings.

  • Click the trello.com checkbox and click Allow on the permission pop up.

  • Login to your Trello account from your Chrome browser. Open your Trello board and select the card you want to track.

  • On the card, under the ACTIONS category, you will find the YoCoBoard Clock In button. Click the button to clock in or clock out.

  • Your time entry will appear on the Hours page of your YoCoBoard account.


1.3 Deactivating the Integration

  • To deactivate this integration, go to Options (3 dots) > More Tools > Extensions.

  • In the list of active extensions, find the YoCoBoard extension card and click the Details button.

  • Scroll down to find Extension Options and click the preview icon to view the extension settings.

  • Uncheck the trello.com checkbox and your integration will be deactivated.
    Note: You can still use the browser widget to clock in and clock out of YoCoBoard (optional).


Posted in: Integrations, Trello

Post Navigation

« Previous 1 2 3 4 Next »

Recent Posts

  • The YoCoBoard Firefox Add-on
  • View & Generate Reports
  • Manage Adjustment Requests
  • Change Staff Skill-set
  • Change Staff to Admin

Categories

  • Account Settings (3)
  • Admin (11)
  • Asana (1)
  • Basics (8)
  • Browser Extension (1)
  • Client (1)
  • Companies (1)
  • Confirm Time Entries (1)
  • General Settings (5)
  • Getting Started (2)
  • Hours (7)
  • Integrations (5)
  • Payroll (1)
  • Peers (2)
  • Projects (5)
  • Projects Association (2)
  • Quick Start Guide (4)
  • Reports (2)
  • Settings (6)
  • Slack (1)
  • Staff (10)
  • Team (4)
  • Time Adjustment (3)
  • Trello (1)
  • Zapier (1)
© Copyright 2023 - YoCoBoard - Support
Infinity Theme by DesignCoral / WordPress